Best Practices Series
Part 2
Sheet Set Manager:
Create a List of Sheets Instantly
Contents
Heidi Hewett, Autodesk, Inc.
■ What Most People Do
Most sets of drawings include a cover sheet or title sheet that has a list
of all the sheets in the set. This list enables people to find design data
throughout the set of drawings, so it must always be accurate. As you
add, remove, or reorganize sheets, you continually modify the list of
sheets to ensure that it is up to date.
■ How to Create a Sheet List Table
■ How to Update a Sheet List Table
■ Where to Go from Here with
Sheet List Tables
In AutoCAD® 2005, you can easily create a sheet list table with data
that is extracted directly from the Sheet Set Manager. If you make
changes to the sheet set, you can instantly update the sheet list table
to reflect the changes.
What Most People Do
Most people create a sheet list table by drawing lines and then
entering information, such as the sheet number and the sheet title, as
individual text objects. When you make changes, you must manually
modify the table by copying or erasing lines and editing the text.
These manual methods are time consuming and prone to error.
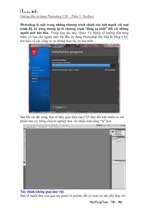
To add a new sheet after sheet A-01
in this sheet list table, I would:
- Stretch or move the lines and text
below A-01 to make room for a new
row.
- Copy a horizontal line and text
from an existing row into the space
for the new row.
- Modify the copied text to reflect
the new sheet number and title.
- Modify the remaining text to
reflect the incremental change to
the sheet numbers.
In addition, any changes you make to the appearance of the table—
color, alignment, and other properties—require you to modify lines
and text individually rather than the table as a whole. What a pain!
How to Create a Sheet List Table
2
How to Create a Sheet List Table
The Sheet Set Manager uses the table and field features to provide an easy-to-use tool for creating a sheet list
table. All it takes is a sheet set and a few minutes of your time.
Using the Sheet Set Manager, you first open an existing sheet set and create a title sheet. Then, you open the
title sheet and insert a sheet list table.
Open an existing sheet set.
Select the Sheet List tab.
Right-click the sheet set name to display the shortcut menu.
Click New Sheet. This will be the title sheet or cover sheet
on which you insert the sheet list table.
Then, open the sheet.
Right-click the sheet set name again to display the shortcut
menu. Then, click Insert Sheet List Table.
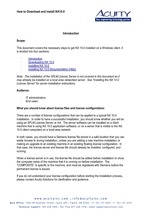
AutoCAD displays the Insert Sheet List Table dialog box, where you control what information is displayed in
the sheet list table and what the table looks like. As you become more familiar with tables, table styles, and
sheet sets, I encourage you to explore this dialog box more thoroughly. For now, I will focus on the most basic
options.
Best Practices Series
3
Select a table style name. You should plan
on creating at least one table style that is
dedicated to sheet list tables.
Enter a title for the sheet list table.
These are the fields and column headings
to be included in the sheet list table. We’ll
use the defaults.
This is a preview of how the table will look,
based on the table style you selected.
Click OK.
A sheet list table is meant to be updated automatically from the Sheet Set Manager, so you should not make
changes directly to the sheet list table. A message box reminds you of this before you insert a sheet list table.
Click OK and insert the sheet list table in the
title sheet drawing.
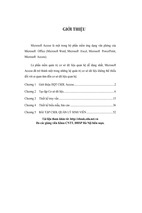
AutoCAD automatically creates a table object and fills in the numbers and titles of all the sheets in the sheet
set. The sheet numbers and sheet titles are inserted as hyperlink fields, enabling you to open the associated
drawing files quickly.
The sheets are displayed with a gray background to show that they
are fields. The hyperlink cursor indicates that the fields are hyperlinks.
Press CTRL and click a sheet number or title to open the drawing file.
How to Update a Sheet List Table
4
How to Update a Sheet List Table
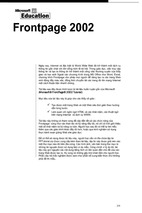
You can easily update a sheet list table to reflect changes made to the sheet set—you might have added sheets
or changed their order.
However, as I mentioned earlier, you shouldn’t modify the sheet list table directly. Use the option in the Sheet
Set Manager instead.
Click a gridline to select the sheet list table.
Right-click and click Update Sheet List Table.
That’s all you have to do. With a simple click on a menu, the sheet list table updates to reflect your changes
to the sheet set.
Best Practices Series
5
Where to Go from Here with Sheet List Tables
The Sheet Set Manager completely automates the process of creating and maintaining a sheet list table, saving
you a significant amount of time and reducing errors. From here, you can learn how to
■
■
Modify the table data settings. For example, you can add or remove columns of data, change the column heading text,
and change the title of the table.
Create or modify the table style dedicated to sheet list tables. For example, you can assign text fonts, choose the text
alignment, and choose table borders.
Try adding a data column on your own or making some other changes. You’ll find that the process is easy and
powerful. Sheet list tables can include more than a dozen additional columns of data, such as the sheet
description, author, creation date, and revision number.
For additional information about customizing the appearance of sheet list tables, see “Work with Table Styles”
in the AutoCAD User’s Guide. To locate this topic in the Help system, enter "work with table styles" (with the
quotes) on the Search tab.
Autodesk, Inc.
111 McInnis Parkway
San Rafael, CA 94903
USA
Autodesk and AutoCAD are registered trademarks of Autodesk, Inc. in the USA and certain other countries. All other brand names, product
names, or trademarks belong to their respective holders.
Copyright © 2004 Autodesk, Inc. All rights reserved.
- Xem thêm -