How to Download and Install NX10.0
Introduction
Scope:
This document covers the necessary steps to get NX 10.0 installed on a Windows client. It
is divided into four sections:
·
·
·
·
Introduction
Downloading NX 10.0
Installing NX 10.0
Installing NX 10.0 Documentation (Help)
Note: The installation of the SPLM License Server is not covered in this document as it
may already be installed on a local area networked server. See “Installing the NX 10.0
License Server” for server installation instructions.
Audience:
·
·
IT administrators
End users
What you should know about license files and license configurations:
There are a number of license configurations that can be applied to a typical NX 10.0
installation. In order to have a successful installation, you should know whether you will be
using an SPLM License Server or not. The server software can be installed on a client
machine that is using NX 10.0 application software, or on a server that is visible to the NX
10.0 client computers on a local area network.
In both cases, you should have a Siemens license file stored in a safe location that you can
easily browse to during installation, unless you are adding a new machine installation or
making an upgrade to an existing machine in an existing floating license configuration. In
that case, the license server and license file should already be installed, configured, and
running.
When a license server is in use, the license file should be edited before installation to show
the computer name of the machine that it is running on before installation. The
“COMPOSITE” is specific to the machine, and must be registered with Siemens before the
permanent license is issued.
If you do not understand your license configuration before starting the installation process,
please contact Acuity Solutions for clarification and guidance.
w w w. a c u i t y i n c . c o m
Main Office: 7320 SW H unz ik er Street
Suite 205
Te c h n i c a l S u p p o r t : 5 0 3 . 4 3 0 . 1 0 5 6
[email protected]
Tig ard, OR 97223
To l l F r e e 8 7 7 . 2 2 8 . 1 7 5 0
V: 503.747.0850
F: 503.747.4269
email suppo
[email protected] m
Page 2 of 24 page s
Note: When installing locally hosted (node locked) NX 10.0 software or when
installing SPLM License Server software, the original location and name of the
license file is unimportant as long as it is accessible via Windows Explorer. The
installer will copy the file to its proper location and rename it accordingly when you
browse to it and select it during the installation process.
The following snap shot shows a license file with the SPLM License Server defined:
The following snap shot shows a license file without the SPLM License Server defined:
w w w. a c u i t y i n c . c o m
Main Office: 7320 SW H unz ik er Street
Suite 205
Te c h n i c a l S u p p o r t : 5 0 3 . 4 3 0 . 1 0 5 6
[email protected]
Tig ard, OR 97223
To l l F r e e 8 7 7 . 2 2 8 . 1 7 5 0
V: 503.747.0850
F: 503.747.4269
email suppo
[email protected] m
Page 3 of 24 page s
Downloading NX 10.0
1.) Download the installation media from Siemens by navigating to the GTAC Support
Site in your web browser, and select “Download files” under “Download & Upload
Files.”
w w w. a c u i t y i n c . c o m
Main Office: 7320 SW H unz ik er Street
Suite 205
Te c h n i c a l S u p p o r t : 5 0 3 . 4 3 0 . 1 0 5 6
[email protected]
Tig ard, OR 97223
To l l F r e e 8 7 7 . 2 2 8 . 1 7 5 0
V: 503.747.0850
F: 503.747.4269
email suppo
[email protected] m
Page 4 of 24 page s
2.) You will be asked for your WEBKEY User Name and Password in an “Authentication
Required” dialogue box. Enter your information in the fields provided and select
“OK.”
3.) Select “All Siemens PLM Products” in the “Full Product Releases” section of the PLM
Download Server page.
w w w. a c u i t y i n c . c o m
Main Office: 7320 SW H unz ik er Street
Suite 205
Te c h n i c a l S u p p o r t : 5 0 3 . 4 3 0 . 1 0 5 6
[email protected]
Tig ard, OR 97223
To l l F r e e 8 7 7 . 2 2 8 . 1 7 5 0
V: 503.747.0850
F: 503.747.4269
email suppo
[email protected] m
Page 5 of 24 page s
4.) The GTAC download server will generate a matrix of products that your WEBKEY is
authorized to download. This may take a little while. Once the matrix is generated
and displayed at the bottom half of the screen, click on “NX/Unigraphics NX.”
w w w. a c u i t y i n c . c o m
Main Office: 7320 SW H unz ik er Street
Suite 205
Te c h n i c a l S u p p o r t : 5 0 3 . 4 3 0 . 1 0 5 6
[email protected]
Tig ard, OR 97223
To l l F r e e 8 7 7 . 2 2 8 . 1 7 5 0
V: 503.747.0850
F: 503.747.4269
email suppo
[email protected] m
Page 6 of 24 page s
5.) Select the platform that you are using to drop down the NX media selection list and
select “nx-10.0.0-64bit.zip.”
6.) Select the “Save File” radio button (or the download accelerator button if one is
installed) in the “Open File” dialogue and select “OK” to download the file to your
download folder.
w w w. a c u i t y i n c . c o m
Main Office: 7320 SW H unz ik er Street
Suite 205
Te c h n i c a l S u p p o r t : 5 0 3 . 4 3 0 . 1 0 5 6
[email protected]
Tig ard, OR 97223
To l l F r e e 8 7 7 . 2 2 8 . 1 7 5 0
V: 503.747.0850
F: 503.747.4269
email suppo
[email protected] m
Page 7 of 24 page s
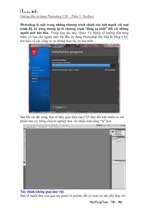
7.) After the NX 10.0 installation media has finished downloading, scroll down to and
select “Documentation” on the item list and select “nx-ugdoc-10.0.0.zip” to download
the NX 10.0 Documentation installation media.
8.) Select the “Save File” radio button (or the download accelerator button if one is
installed) in the “Open File” dialogue and select “OK” to download the file to your
download folder.
w w w. a c u i t y i n c . c o m
Main Office: 7320 SW H unz ik er Street
Suite 205
Te c h n i c a l S u p p o r t : 5 0 3 . 4 3 0 . 1 0 5 6
[email protected]
Tig ard, OR 97223
To l l F r e e 8 7 7 . 2 2 8 . 1 7 5 0
V: 503.747.0850
F: 503.747.4269
email suppo
[email protected] m
Page 8 of 24 page s
Installing NX 10.0
1.) After downloading the compressed media files from the GTAC Download Area, open
Windows Explorer and navigate to the folder where the files were stored. The
downloaded media will create a new folder structure when uncompressed, so it can
be uncompressed in the download directory, in another directory, or on the desktop.
Uncompressing both media files will result in two new folders as shown in the
following graphic.
2.) Double click on the folder named “nx-10.0.0-win64” and double click on the
“Launch.exe” program file to start the installation splash screen.
w w w. a c u i t y i n c . c o m
Main Office: 7320 SW H unz ik er Street
Suite 205
Te c h n i c a l S u p p o r t : 5 0 3 . 4 3 0 . 1 0 5 6
[email protected]
Tig ard, OR 97223
To l l F r e e 8 7 7 . 2 2 8 . 1 7 5 0
V: 503.747.0850
F: 503.747.4269
email suppo
[email protected] m
Page 9 of 24 page s
3.) When the NX 10.0 installer splash screen appears, select “Install NX.”
4.) When prompted for the language of the installation, click ‘OK” to accept the default
language of English or use the drop-down slection box to select a different language
and select “OK.”
w w w. a c u i t y i n c . c o m
Main Office: 7320 SW H unz ik er Street
Suite 205
Te c h n i c a l S u p p o r t : 5 0 3 . 4 3 0 . 1 0 5 6
[email protected]
Tig ard, OR 97223
To l l F r e e 8 7 7 . 2 2 8 . 1 7 5 0
V: 503.747.0850
F: 503.747.4269
email suppo
[email protected] m
Page 10 of 24 pages
5.) Select “Next>” to continue the installation in the “Welcome” screen.
6.) Select “Next>” to accept a typical NX 10.0 installation.
w w w. a c u i t y i n c . c o m
Main Office: 7320 SW H unz ik er Street
Suite 205
Te c h n i c a l S u p p o r t : 5 0 3 . 4 3 0 . 1 0 5 6
[email protected]
Tig ard, OR 97223
To l l F r e e 8 7 7 . 2 2 8 . 1 7 5 0
V: 503.747.0850
F: 503.747.4269
email suppo
[email protected] m
Page 11 of 24 pages
7.) Select “Next>” to accept the default installation folder.
8.) The next few steps on the following two pages are based on the license
configuration for your company’s Sold-To license configuration. Follow
steps 9a through 10a for a floating license configuration or follow steps 9b
through 11b for a non-floating license configuration:
w w w. a c u i t y i n c . c o m
Main Office: 7320 SW H unz ik er Street
Suite 205
Te c h n i c a l S u p p o r t : 5 0 3 . 4 3 0 . 1 0 5 6
[email protected]
Tig ard, OR 97223
To l l F r e e 8 7 7 . 2 2 8 . 1 7 5 0
V: 503.747.0850
F: 503.747.4269
email suppo
[email protected] m
Page 12 of 24 pages
Floating License Configuration
9a.) If you are using a license server and know its name, enter it in the field provided.
(note: A typical server name layout looks like 28000@
where
is the name of the server that is running the license daemon).
If there is already a license server daemon running locally on this machine, the
default entry should be correct.
10a.) Select “Next>”
w w w. a c u i t y i n c . c o m
Main Office: 7320 SW H unz ik er Street
Suite 205
Te c h n i c a l S u p p o r t : 5 0 3 . 4 3 0 . 1 0 5 6
[email protected]
Tig ard, OR 97223
To l l F r e e 8 7 7 . 2 2 8 . 1 7 5 0
V: 503.747.0850
F: 503.747.4269
email suppo [email protected] m
Page 13 of 24 pages
Locally Node Locked Configuration
9b.) If you are installing in a locally node locked configuration, and you have a license
file select “Browse.”
10b.) Browse to the license file that you have saved, and select it.
11b.) Select “Next>.”
w w w. a c u i t y i n c . c o m
Main Office: 7320 SW H unz ik er Street
Suite 205
Te c h n i c a l S u p p o r t : 5 0 3 . 4 3 0 . 1 0 5 6
[email protected]
Tig ard, OR 97223
To l l F r e e 8 7 7 . 2 2 8 . 1 7 5 0
V: 503.747.0850
F: 503.747.4269
email suppo [email protected] m
Page 14 of 24 pages
12.) Select the installation language and select “Next>.”
13.) Review the installation information and select “Install” to continue.
w w w. a c u i t y i n c . c o m
Main Office: 7320 SW H unz ik er Street
Suite 205
Te c h n i c a l S u p p o r t : 5 0 3 . 4 3 0 . 1 0 5 6
[email protected]
Tig ard, OR 97223
To l l F r e e 8 7 7 . 2 2 8 . 1 7 5 0
V: 503.747.0850
F: 503.747.4269
email suppo [email protected] m
Page 15 of 24 pages
14.) The installShield Wizard will document the installation steps…
15.) When the “InstallShield Wizard Completed” dialogue appears, select “Finish.”
w w w. a c u i t y i n c . c o m
Main Office: 7320 SW H unz ik er Street
Suite 205
Te c h n i c a l S u p p o r t : 5 0 3 . 4 3 0 . 1 0 5 6
[email protected]
Tig ard, OR 97223
To l l F r e e 8 7 7 . 2 2 8 . 1 7 5 0
V: 503.747.0850
F: 503.747.4269
email suppo [email protected] m
Page 16 of 24 pages
16.) Select “Exit” to return to Windows.
w w w. a c u i t y i n c . c o m
Main Office: 7320 SW H unz ik er Street
Suite 205
Te c h n i c a l S u p p o r t : 5 0 3 . 4 3 0 . 1 0 5 6
[email protected]
Tig ard, OR 97223
To l l F r e e 8 7 7 . 2 2 8 . 1 7 5 0
V: 503.747.0850
F: 503.747.4269
email suppo [email protected] m
Page 17 of 24 pages
Installing NX 10.0 Documentation (Help)
1.) Open Windows Explorer and return to the folder where the uncompressed media
files were stored.
2.) Double click on the folder named “nx-10.0-nxdocs-win64” and double click on the
“Launch.exe” program file to start the installation splash screen.
w w w. a c u i t y i n c . c o m
Main Office: 7320 SW H unz ik er Street
Suite 205
Te c h n i c a l S u p p o r t : 5 0 3 . 4 3 0 . 1 0 5 6
[email protected]
Tig ard, OR 97223
To l l F r e e 8 7 7 . 2 2 8 . 1 7 5 0
V: 503.747.0850
F: 503.747.4269
email suppo [email protected] m
Page 18 of 24 pages
3.) Select “Install Documentation Server.” at the NX 10.0 Documentation splash
screen.
4.) Select installation language and/or select “OK” in the language selection
dialogue.
w w w. a c u i t y i n c . c o m
Main Office: 7320 SW H unz ik er Street
Suite 205
Te c h n i c a l S u p p o r t : 5 0 3 . 4 3 0 . 1 0 5 6
[email protected]
Tig ard, OR 97223
To l l F r e e 8 7 7 . 2 2 8 . 1 7 5 0
V: 503.747.0850
F: 503.747.4269
email suppo [email protected] m
Page 19 of 24 pages
5.) Select “Next>” at the InstallShield Wizard welcome screen.
6.) If a dialogue appears with a message regarding the current Java Version select
OK and Cancel or Abort, and update the JRE to the latest 64 bit version. After
updating the JRE to the latest 64 bit revision, restart the PLM Document Server
Install.
Caution… If this message appears, and it is not resolved by installing a
compatible version of the Java Runtime Environment, the document server
service will not start at the end of the Document Server installation.
w w w. a c u i t y i n c . c o m
Main Office: 7320 SW H unz ik er Street
Suite 205
Te c h n i c a l S u p p o r t : 5 0 3 . 4 3 0 . 1 0 5 6
[email protected]
Tig ard, OR 97223
To l l F r e e 8 7 7 . 2 2 8 . 1 7 5 0
V: 503.747.0850
F: 503.747.4269
email suppo [email protected] m
Page 20 of 24 pages
7.) Select “Next>” to accept the default folder location of the Documentation Server
application.
8.) Select “Install” at the Ready to Install Dialogue.
w w w. a c u i t y i n c . c o m
Main Office: 7320 SW H unz ik er Street
Suite 205
Te c h n i c a l S u p p o r t : 5 0 3 . 4 3 0 . 1 0 5 6
[email protected]
Tig ard, OR 97223
To l l F r e e 8 7 7 . 2 2 8 . 1 7 5 0
V: 503.747.0850
F: 503.747.4269
email suppo [email protected] m