Robotics!
Student Workbook
Version 1.5
Note regarding the accuracy of this text:
Accurate content is of the utmost importance to the authors and
editors of the Stamps in Class texts. If you find any error or
subject that needs clarification, please report it to
[email protected].
Warranty
Parallax warrants its products against defects in materials and workmanship for a period of 90 days from receipt of product. If you
discover a defect, Parallax will, at its option, repair or replace the merchandise, or refund the purchase price. Before returning the
product to Parallax, call for a Return Merchandise Authorization (RMA) number. Write the RMA number on the outside of the box used
to return the merchandise to Parallax. Please enclose the following along with the returned merchandise: your name, telephone
number, shipping address, and a description of the problem. We will return your product or its replacement using the same shipping
method used to ship the product to Parallax.
14-Day Money Back Guarantee
If, within 14 days of having received your product, you find that it does not suit your needs, you may return it for a full refund. Parallax
will refund the purchase price of the product, excluding shipping/handling costs. This guarantee is void if the product has been altered
or damaged.
Copyrights and Trademarks
This documentation is copyright 2001 by Parallax, Inc. BASIC Stamp is a registered trademark of Parallax, Inc. If you decide to use the
name BASIC Stamp on your web page or in printed material, you must state: "BASIC Stamp is a registered trademark of Parallax, Inc."
Other brand and product names are trademarks or registered trademarks of their respective holders.
Disclaimer of Liability
Parallax, Inc. is not responsible for special, incidental, or consequential damages resulting from any breach of warranty, or under any
legal theory, including lost profits, downtime, goodwill, damage to, or replacement of equipment or property, or any costs of
recovering, reprogramming, or reproducing any data stored in or used with Parallax products. Parallax is also not responsible for any
personal damage, including that to life and health, resulting from use of any of our products. You take full responsibility for your
BASIC Stamp application, no matter how life threatening it may be.
Internet Access
We maintain Internet systems for your use. They can be used to obtain free Parallax software and documentation and also to
purchase Parallax products. These systems may also be used to communicate with members of Parallax and other customers. Access
information is shown below:
E-mail:
Web:
[email protected]
http://www.parallaxinc.com and http://www.stampsinclass.com
Internet BASIC Stamp Discussion Lists
We maintain two e-mail discussion lists for people interested in BASIC Stamps (subscribe at http://www.parallaxinc.com under the
technical support section). The BASIC Stamp list server includes engineers, hobbyists, and enthusiasts. The list works like this: lots of
people subscribe to the list, and then all questions and answers sent to the list are distributed to all subscribers. It’s a fun, fast, and
free way to discuss BASIC Stamp issues and get answers to technical questions. This list generates about 40 messages per day.
The Stamps in Class list is for students and educators who wish to share educational ideas (subscribe at http://www.stampsinclass.com
under the discuss/e-mail section). This list works the same way the BASIC Stamp list server does, and it currently generates about five
messages per day.
Contents
Table of Contents
Preface .......................................................................................................................................... v
Audience and Teacher’s Guides .....................................................................................................................................vi
Copyright and Reproduction..........................................................................................................................................vi
Typographical Conventions .......................................................................................................................................... vii
Robotics! Contributors................................................................................................................................................. viii
Read this First - Before You Start ................................................................................................... 1
Check Your Servo Labels................................................................................................................................................. 1
Use the Right Power Supply ........................................................................................................................................... 2
The New Stamps in Class Robotics! Web Page ........................................................................................................... 2
Chapter #1: Assembling and Testing Your Boe-Bot........................................................................... 5
About Robotics Competitions and Robot Development........................................................................................... 5
Activity #1: Boe-Bot Parts and Tools ............................................................................................................................ 6
Activity #2: Boe-Bot Mechanical Assembly.................................................................................................................. 9
Activity #3: Programming The Boe-Bot’s BASIC Stamp 2 On-Board Computer................................................19
Activity #4: Testing the Servos Individually................................................................................................................26
Activity #5: Running Both Servos.................................................................................................................................33
Activity #6: Tuning the Servos – Calibration in Software.......................................................................................35
Summary and Applications ...........................................................................................................................................38
Questions and Projects .................................................................................................................................................40
Chapter #2: Programming the Boe-Bot to Go Places...................................................................... 43
Converting Instructions to Motion..............................................................................................................................43
Activity #1: Low Battery Indicator...............................................................................................................................44
Activity #2: Controlling Distance .................................................................................................................................48
Activity #3: Maneuvers – Making Turns ......................................................................................................................53
Activity #4: Maneuvers – Ramping ..............................................................................................................................55
Activity #5: Remembering Long Lists Using EEPROM...............................................................................................57
Activity #6: Simplify Navigation with Subroutines ...................................................................................................62
Activity #7: All Together Now........................................................................................................................................64
Summary and Applications ...........................................................................................................................................70
Questions and Projects .................................................................................................................................................71
Chapter #3: Tactile Navigation with Whiskers ................................................................................ 75
Tactile Navigation ...........................................................................................................................................................75
Page i
Contents
Activity #1: Building and Testing the Whiskers..........................................................................................................75
Activity #2: Navigation With Whiskers........................................................................................................................82
Activity #3: Looking at Multiple Inputs as Binary Numbers ....................................................................................86
Activity #4: Artificial Intelligence and Deciding When You’re Stuck.....................................................................90
Summary and Applications ...........................................................................................................................................95
Questions and Projects..................................................................................................................................................96
Chapter #4: Light Sensitive Navigation with Photoresistors ............................................................ 99
Is Your Boe-Bot a Photophile or a Photophobe?.....................................................................................................99
Activity #1: Building and Testing Photosensitive Eyes ...........................................................................................100
Activity #2: A Light Compass.......................................................................................................................................104
Activity #3: Follow the Light!.......................................................................................................................................107
Activity #4: Line Following ...........................................................................................................................................110
Summary and Applications .........................................................................................................................................114
Questions and Projects................................................................................................................................................115
Chapter #5: Object Detection Using Infrared ................................................................................117
Using Infrared Headlights to See the Road .............................................................................................................117
Infrared Headlights ......................................................................................................................................................117
The Freqout Trick ..........................................................................................................................................................118
Activity #1: Building and Testing the New IR Transmitter/Detector ...................................................................119
Activity #2: Object Detection and Avoidance ..........................................................................................................123
Activity #3: Navigating by the Numbers in Real-Time............................................................................................126
Summary and Applications .........................................................................................................................................130
Questions and Projects................................................................................................................................................131
Chapter #6: Determining Distance Using Frequency Sweep .......................................................... 133
What’s a Frequency Sweep? .......................................................................................................................................133
Activity #1: Testing the Frequency Sweep................................................................................................................133
Activity #2: The Drop-off Detector ...........................................................................................................................140
Activity #3: Boe-Bot Shadow Vehicle........................................................................................................................145
Summary and Applications .........................................................................................................................................151
Questions and Projects................................................................................................................................................153
Appendix A: Boe-Bot Parts Lists and Sources .............................................................................. 155
Appendix B: PC to Stamp Communication Trouble-Shooting ........................................................ 159
Appendix C: PBASIC Quick Reference .......................................................................................... 161
Page ii
Contents
Appendix D: Building Servo Ports on the Rev A Board of Education................................................169
Appendix E: Board of Education Rev A Voltage Regulator Upgrade Kit............................................173
Appendix F: Breadboarding Rules.................................................................................................175
Appendix G: Resistor Color Codes ................................................................................................177
Appendix H: Tuning IR Distance Detection ....................................................................................179
Appendix I: Boe-Bot Competition Maze Rules ...............................................................................185
Page iii
Preface
Preface
Robots are used in the auto, medical, and manufacturing industries, and of course, in many science
fiction films. Building and programming a robot is a combination of mechanics, electronics, and problem
solving. What you're about to experience with the Boe-Bot will be relevant to realistic applications using
robotic control, the only difference being the size and sophistication. The electronic control principles,
example program listings, and circuits you will use are very similar (and sometimes identical) to industrial
applications developed by engineers.
The word "robot" first appeared in a Czechoslovakian satirical play Rossum's Universal Robots by
Karel Capek in 1920. Robots in this play tended to be human-like. From this point it onward, it seemed that
many science fiction stories involved these robots revolting against human authority. This changed when
General Motors installed the first robots in its manufacturing plant in 1961. These automated machines
presented an entirely different image from the “human form” robots of science fiction.
This series of experiments will introduce you to basic robotic concepts using the Board of Education
Robot (hereafter the "Boe-Bot"). The experiments will begin with construction of the Boe-Bot. After that,
we'll program the Boe-Bot for basic maneuvers, and proceed to add sensors that will allow it to react to its
surroundings. The goal of this text is to show students how easy it is to become interested in and excited
about the fields of engineering, mechatronics, and software development as they design, construct and
program an autonomous robot. The Boe-Bot provides students with a project area to build and customize
their own mechanical, electrical, and programming projects. The use of a Boe-Bot to introduce
microcontroller circuits and interfacing is ideal since the outputs are almost entirely visible and easy to
customize.
The Board of Education Rev B, which serves as the Boe-Bot’s prototyping platform, was designed for
use with all five Stamps in Class series of experiments, including Robotics! The Board of Education, Rev B has
four servo ports, and this makes it possible to use four servos without taking up any space on the breadboard
prototyping area. Each port has a dedicated I/O line (P12, P13, P14, or P15 depending on the port), and each
can be used for controlling a servo. Each servo port supply is tied to Vin, the unregulated 6 V supply from the
battery pack, so use of a higher voltage supply is discouraged due to its tendency to overwork the servos. The
Board of Education Rev B also has two large capacitors that stabilize the BASIC Stamp’s power supply. They
ensure that the BASIC Stamp operates continuously, even when the servos are performing direction changes,
which could otherwise cause brownout conditions.
Robotics! Version 1.5 • Page v
Preface
The Robotics curriculum is periodically revised and updated based on feedback from students and
educators. If you would like to author an addition to this curriculum, or have ideas for improvements, please
send them to
[email protected]. We'll do our best to integrate your ideas and assist you with
whatever technical support, sales support, or on-site training you need. If we accept your Boe-Bot project,
we'll send you a free Boe-Bot.
Audience and Teacher’s Guide
The Robotics curriculum was created for ages 15+ as a subsequent text to the “What’s a
Microcontroller?” guide. Like all Stamps in Class curriculum, this series of experiments teaches new
techniques and circuits with minimal overlap between the other texts. The general topics introduced in this
series are: basic Boe-Bot navigation under program control, navigation based on a variety of sensor inputs,
navigation using feedback and various control techniques, and navigation using programmed artificial
intelligence. Each topic is addressed in an introductory format designed to impart a conceptual
understanding along with some hands-on experience. Those who intend to delve further into industrial
technology, electronics or robotics are likely to benefit significantly from initial experiences with these topics.
Experts in their field independently author each set of Stamps in Class experiments, and they are
provided leeway in terms of format. As a result, the depth and availability of teachers’ guides varies. Please
contact Parallax, Inc. if you have any questions. If you are interested in contributing material to the Stamps in
Class series, please submit your proposal to
[email protected].
Copyright and Reproduction
Stamps in Class curriculum is copyright Parallax 2001. Parallax grants every person conditional
rights to download, duplicate, and distribute this text without our permission. The condition is that this text
or any portion thereof, should not be duplicated for commercial use resulting in expenses to the user beyond
the marginal cost of printing. Preferably, duplication would have no expense to the student. Any educational
institution wishing to produce duplicates for its students may do so without our permission. This text is
available in printed format from Parallax. Because we print the text in volume, the consumer price is often
less than typical xerographic duplication charges. This text is also available for free download from the
www.stampsinclass.com -> Downloads -> Educational Curriculum page in PDF format. Documents in this
format can be viewed and printed using Adobe Systems’ Acrobat Reader software available from
www.adobe.com. This software can also be installed directly from the Parallax CD.
This text may be translated to any other language with prior permission of Parallax, Inc.
Page vi • Robotics! Version 1.5
Preface
Typographical Conventions
Checklist instruction. The square box indicates a “how to” instruction. These instructions should be
followed sequentially, like a checklist, through each activity in this text.
TIP
Pay attention to and follow these instructions. They will make the activities easier
and save time.
FYI
This box contains useful information.
!
Caution: follow these instructions, or you may end up damaging your
hardware.
' PBASIC Program Listings.
' PBASIC excerpt from a program listing. This kind of excerpt
' always follows a paragraph of text explaining what it does
' and how it works.
PBASIC code in a paragraph of text takes the form of: command argument1, argument2, etc. Note that
the command is not italicized, but its arguments are.
Robotics! Version 1.5 • Page vii
Preface
Robotics! Contributors
Chuck Schoeffler, Ph.D., authored portions
of the v1.2 text in conjunction with Parallax, Inc. At
that time, Dr Schoeffler was a professor at
University of Idaho's Industrial Technology
Education department. He designed the original
Board of Education Robot (Boe-Bot) shown here
along with many similar robot derivatives with
many unique functions. After several revisions,
Chuck's design was adopted as the basis of the
Parallax Boe-Bot that is used in this Text. Russ
Miller of Parallax designed the Boe-Bot based on
this prototype.
Andrew Lindsay, Parallax Chief Roboticist, wrote the majority of the v1.3 text with three goals in
mind. First, support all activities in the text with carefully written “how to” instructions. Second, expose the
reader and student to new circuit, programming, engineering and robotic concepts in each chapter. Third,
ensure that the experiments can be performed with a high degree of success using either the Rev A or Rev B
Board of Education. Parallax 2000 summer intern, Branden Gunn, assisted in the illustration of this revision.
Thanks to Dale Kretzer for editorial review, which was incorporated into v1.4. Thanks also to the
following Stamps in Class e-group participants for their input: Richard Breen, Robert Ang, Dwayne Tunnell,
Marc Pierloz, and Nagi Babu. These participants submitted one or more of the following: error corrections,
useful editorial suggestions, or new material for v1.4. Thanks to student Laura Wong and to Rob Gerber for
their respective contributions to v1.5. A special thanks to the Parallax, Inc. staff. Each and every member of
the Parallax team has in some way contributed to making the Stamps in Class program a success.
If you have suggestions, think you found a mistake, or would like to contribute an activity or chapter
to forthcoming Robotics! v1.6 or More Robotics! texts, contact us at
[email protected].
Subscribe and stay tuned to the Stamps in Class e-group for the latest in free hardware offers for Robotics!
contributions. See the Internet BASIC Stamp Discussion Lists section just before the Table of Contents for
information on how to subscribe.
Page viii • Robotics! Version 1.5
Read This First – Before You Start
Read this First Before You Start
This Robotics! update contains three important messages:
1. Check your Servo Labels
2. Use the Right Power Supply
3. New Robotics! Web Site
Check Your Servo Labels
Starting in June, 2001, Parallax will ship all Robotics! kits with pre-modified servos. The Robotics! v1.5
student workbook is written exclusively for use with Boe-Bots that have pre-modified servos. Pre-modified
servos are labeled “PM”. If you have a Boe-Bot purchased before June, 2001, it most likely has standard
servos, which are labeled “STD”. If you have Standard servos, use the Robotics! v1.4 text. Both versions of the
Robotics! Student Workbook (v1.4 and v1.5) are available for free download from the www.stampsinclass.com
-> Robotics page.
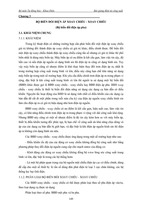
If you have questions about whether your servos are pre-modified or standard, check the label on the front
of each servo against those shown in the Servo Identification Table below.
Servo Identification Table
Parallax
Servo
Check the labeling on the servos in your Robotics!
kit.
Examples of the labeling for
pre-modified (PM) and
standard (STD) servos
Use Robotics! v1.5 (this text)
Use this student workbook only if the letters PM
are shaded on the label on the front of your servos.
Use Robotics! v1.4
If the letters PM are not shaded or do not appear
on your servo’s labeling, use the Robotics v.1.4
Student Workbook available for free download
from the www.stampsinclass.com - > Robotics
page.
Robotics! Version 1.5 • Page 1
Read this First – Before You Start
Use the Right Power Supply
The Boe-Bot is designed for use with the battery
pack that comes with the Robotics! kits. When
selecting batteries for the Boe-Bot:
• Use only AA 1.5 V batteries with this
battery pack.
• Do not use 1.2 V rechargeable AA batteries.
!
Do not use a 9 V battery or AC
adaptor; it could damage your
Boe-Bot’s servo motors.
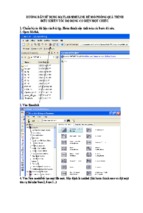
If you want to use a wall mount AC adaptor and
save batteries for autonomous navigation, make
sure your AC adaptor has these output
specifications (preferred values are bold):
Output:
• Voltage rating should be 6 V DC or 7.5 V DC
• Current rating from 600 mA to 1000mA (1 A)
• 2.1 mm center positive barrel plug
Make sure the AC adaptor’s label has the
center positive symbol
The New Stamps in Class Robotics! Web Page
Visit www.stampsininclass.com -> Robotics (see facing page). This page contains:
• Student project examples using the Boe-Bot
• More Boe-Bot activities for students after they have completed the Robotics! Student Workbook
• Boe-Bot application kits
• Boe-Bot application modules
Students and instructors are encouraged to submit projects to
[email protected] for posting to
this resource site. Hobbyists and hardware developers are also encouraged to submit proposals, proofs of
concept, or completed and documented Boe-Bot application kits/add-on modules.
Page 2 • Robotics! Version 1.5
Read This First – Before You Start
From the www.stampsininclass.com -> Robotics Web Page
Robotics! is our most popular series. With over 10,000 Parallax BoeBots in use around the world, it's clearly the light, sound and movement
that immediately captures the interest of the student. This is not a toy;
the concepts are directly applicable to microcontroller interfacing and
code development.
Follow these links to see:
Student Project Examples
More Boe-Bot Activities
Boe-Bot Application Kits
Boe-Bot Application Modules
Student Projects:
Title
Author
Maze
Runners
9th Grader,
Laura Wong
Overview
Includes introductions to the mechanical
problems associated with maze
navigation, state machine design for
maze navigation, and PBASIC program
examples used with the Boe-Bot.
Parallax grade: A+, Great work Laura!
Boe-Bot Applications Notes:
Title
Coming Soon - Boe-Bot
Application Kits and
Modules:
Kit - IR Wheel Encoder
Module – Line Follower
Module - Compass
Concepts Introduced/Covered
Includes introduction to pulse width modulation for
communication, examples (with PBASIC
Controlling Your
programming examples for the Boe-Bot) of reading
Boe-Bot with a
IR remote control codes, sending codes to your
Universal Remote
Boe-Bot and controlling your Boe-Bot using the
Channel and Volume keys.
Use the Reset button on the Boe-Bot to toggle
On/Off with Reset
Program Execution on/ff.
Robotics! Version 1.5 • Page 3
Chapter #1: Assembling and Testing Your Boe-Bot
Chapter #1:
Assembling
and Testing
Your Boe-Bot
About Robotics Competitions and Robot Development
Students in high schools and colleges preparing their entries for
various robotics competitions get first-hand exposure to the
engineering occupation. They start by working in teams developing a
Robot’s subsystems. A robot’s subsystems include its motors, sensor
arrays, microprocessor, and mechanical linkages. Next they test and
trouble-shoot the subsystems. Then comes system integration, the
process of making all the Robot’s subsystems work together.
Once the testing and trouble-shooting is finished at the subsystem level, a robot’s subsystems have to be
connected to and controlled by a microprocessor. The process of getting all the subsystems (including the
microprocessor) to work together to make the robot perform its assigned task list is called system
integration. System integration can be tricky to begin with, but robotics teams who skipped any of the testing
and troubleshooting at the subsystem level often have much larger problems with their system integration.
Many a late night can be spent trying to get the robot to work the way it’s supposed to. If bugs are hiding in
the subsystems when you’re trying to do system integration, it only compounds the problems.
Even when testing and trouble shooting is performed for each subsystem, it can still be the most difficult part
of robot development. For example, a group at a recent robotics competition spent five hours trying to get a
Sumo wrestling robot to work right with no luck. Later, by utilizing the BASIC Stamp’s Debug Terminal, the
testing and troubleshooting took less than 5 minutes.
FYI
The term BASIC Stamp will be used throughout this text to refer to the
BASIC Stamp 2.
Testing and troubleshooting at each phase of robot development is a skill that one gets better at with
practice. By following the instructions in the activities in this student workbook, you’ll get a taste of testing
and trouble shooting while putting your Boe-Bot together and getting it up and running. With practice, you’ll
enjoy more five-minute troubleshooting times and less of the five-hour variety.
Robotics! Version 1.5 • Page 5
Chapter #1: Assembling and Testing Your Boe-Bot
This chapter is separated into six activities:
1. Boe-Bot Parts and Tools
2. Boe-Bot Mechanical Assembly
3. Programming the Boe-Bot’s BASIC Stamp 2 On-Board Computer
4. Testing the Servos Individually
5. Running Both Servos
6. Tuning the Servos – Calibration in Software
Each of these activities involves discrete steps to get the Boe-Bot up and running. First, check to make sure
you have all your parts. Next, put the mechanical parts together. After that, test the microprocessor
subsystem. Then test each servo motor individually. Then, make the servo motors work in unison. Last, but
certainly not least, calibrate the pre-modified servos. By carefully following the instructions in these first six
activities, you ensure that your microprocessor and motor subsystems are working reliably. The task in later
chapters will be to develop and test a variety of sensors and integrate them with the rest of the Boe-Bot’s
subsystems. In Chapters 3-6, you’ll isolate and test the sensors before writing PBASIC programs that
integrate the sensor subsystems. For example, in chapter 3, you’ll first construct and test whiskers, sensors
that tell the Boe-Bot when it’s bumped into something. Once the testing and trouble-shooting is complete,
you’ll move on to writing PBASIC programs that make use of the whisker input signals for directing the BoeBot’s motion.
Activity #1: Boe-Bot Parts and Tools
Let’s get started by taking an inventory of the tools and parts we’ll need to get though the activities in this
student workbook. For starters, all activities in this student workbook require a personal computer (PC)
with the Windows 95/98/... operating system. You’ll also need a few simple hand tools, all of which are
common and can be found in most households, and school shops. They can also be purchased at local
hardware stores. The parts for the Boe-Bot are either included in the Boe-Bot full kit or in a combination of
the BOE Full Kit and the Robotics! parts kit. See Appendix A: Boe-Bot Parts Lists and Sources for more
information.
Page 6 • Robotics! Version 1.5
Chapter #1: Assembling and Testing Your Boe-Bot
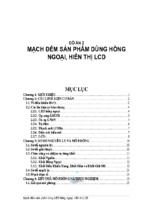
The Simple Hand Tools
Recommended Tools
The top row of tools in Figure 1.1 are recommended
for the Activities in Chapter #1.
(1) Phillips #1 point screwdriver
(1) ¼” Combination wrench
The tools shown on the bottom row will come in
handy for the activities from Chapter #2 onward.
(1) Small needle nose pliers
(1) Wire cutter/stripper
Figure 1.1: Recommended tools.
Boe-Bot Parts Inventory
Before getting started, take an inventory of the parts in your kit. Appendix A: Boe-Bot Parts Lists and
Sources will tell you how many of each part should be in your kit. For help with identifying each part,
use the back cover of this text; it has labeled pictures of all of the Boe-Bot parts.
Gather the parts shown in Figure 1.2 and set them aside for use as you go through the rest of the
activities in this chapter.
Robotics! Version 1.5 • Page 7
Chapter #1: Assembling and Testing Your Boe-Bot
Chapter #1 Parts List:
A
B
C
(1)
(1)
(2)
D
E
F
(2)
(1)
(2)
G
(1)
H
(1)
I
J
K
L
M
N
O
P
Q
R
(2)
(1)
(10)
(2)
(8)
(8)
(4)
(1)
(4)
(1)
Boe-Bot chassis
Battery pack
Parallax Pre-Modified
Servos (labeled PM)
Plastic wheels
Polyethylene ball
9/32” Rubber
Grommets
13/32” Rubber
Grommet
Board of Education and
BASIC Stamp 2
O-ring tires
Cotter pin
4-40 locknuts
4-40 flathead screws
3/8” 4-40 screws
1/4” 4-40 screws
1/2" Standoffs
Serial cable
AA alkaline batteries
Parallax CD
B
A
D
L
K
I
J
P
H
G
F
E
C
M
Q
N
O
R
Figure 1.2: Chapter #1 parts.
Page 8 • Robotics! Version 1.5
Chapter #1: Assembling and Testing Your Boe-Bot
Activity #2: Boe-Bot Mechanical Assembly
This section breaks assembling the Boe-Bot into steps. In each step, you gather a few of the parts, and then
assemble them so that they match the pictures. Each picture has instructions that go with it; make sure to
follow them carefully.
Mounting the Topside Hardware
Figure 1.3 shows the Boe-Bot chassis, topside
hardware and mounting screws.
Parts List:
(1)
(4)
(4)
(2)
(1)
Boe-Bot Chassis
Standoffs
1/4” 4-40 Screws
9/32” Rubber grommets
13/32” Rubber grommet
Figure 1.3: Chassis and topside hardware.
Assembly:
Figure 1.4 shows the topside hardware attached to the Boe-Bot chassis. Each rubber grommet has a groove
in its outer edge that holds it in place in a hole on the top of the Boe-Bot chassis.
Robotics! Version 1.5 • Page 9
Chapter #1: Assembling and Testing Your Boe-Bot
Insert the 13/32” rubber grommet into
the hole in the center of the Boe-Bot
chassis.
Insert the two 9/32” rubber grommets
into the two corner holes as shown.
Use the four 1/4” 4-40 screws to attach
the four standoffs to the chassis as
shown.
Figure 1.4: Topside hardware assembled.
Removing the Servo Horns
Get the two Parallax pre-modified servos
from your parts kit, shown in Figure 1.5.
Each servo has a horn attached to its
output shaft by a Phillips screw.
Horn
Phillips
Screw
Parts List
(2) Pre-modified servos
Figure 1.5: Parallax pre-modified servos.
Figure 1.6 shows the dehorned servos.
Unscrew each of the Phillips screws,
then pull each servo horn upwards and
off of the servo output shaft.
Save the screws for attaching the BoeBot wheels.
Page 10 • Robotics! Version 1.5
Figure 1.6: Pre-modified servos dehorned.