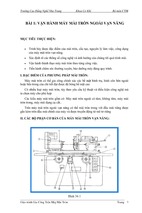
Mô tả:
Version 5 Release 10
Mold Tooling Design
Mold Tooling Design
Preface
Using this guide
What's New
Getting Started
Entering the Mold Design workbench
Retrieving Part
Defining the Mold Base
Positioning Part
Splitting the core and the cavity
Inserting components
Positioning components on the base
Creating a gate
Creating a runner
Creating a coolant channel
Saving data
Basic Tasks
Preparing the part to mold
Creating a Mold Base
Creating a User-defined Mold Base
Creating a Standard Mold Base
Adding a Plate
Adding an Insert
Standard mold components
Component parameters
Positioning components
Positioning a Slider
Editing components
Deleting components
Page 1
Mold Tooling Design
Version 5 Release 10
Injection features
Gates
Runners
Coolant channels
Splitting components
Saving data
Advanced Tasks
Generating the Bill of Material
Modifying the Geometry of Components
User Component Requirements
Using Assembled Components
Drilling components
Adding or Removing Material around a Component
Adding your Catalog
Linking your catalog to another
Using your catalog
Adding mold bases to catalogs
Checking clash and clearance
Mold kinematics
Using Drafting functionalities
Using Prismatic Machining functionalities
Using Surface Machining functionalities
Analyze Holes in Plates
Mold Tooling Design Workbench Description
Menu bar
Tool bars
Specification Tree
Customization
Glossary
Index
Page 2
Mold Tooling Design
Version 5 Release 10
Page 3
Preface
The Mold Tooling Design application helps you design a complete injection mold,
from the mold base to the components using user-defined and standard catalogs.
The Mold Tooling Design User's Guide has been designed to show you how to
create a mold base and add all the required mold components to it.
Using this guide
Using This Guide
Prior to reading the Mold Tooling Design user's guide, you are recommended to have
a look at the Infrastructure User's Guide which will give you all information on the
generic capabilities common to all products.
Version 5 Release 10
Mold Tooling Design
Page 4
What's New?
New Functionalities
You can now insert a SPRING component into a mold base.
You can now define rules for positioning and dimensioning the components you are
creating.
Enhanced Functionalities
You can now retrieve the list of all original parameters for the component you are
creating or editing. .
All existing catalogs have been enhanced.
The exact pre-visualization of a given component selected from a catalog is now
possible at any time of the component creation.
Proper orientation is now given by default to the components you create and add into
the mold base.
Mold Tooling Design
Version 5 Release 10
Page 5
Getting Started
Before getting into a more detailed use of the Mold Tooling Design application, here is
a step-by-step scenario which will help you become familiar with the main functions of
the product.
This exercise should take you no longer than 30 minutes to complete.
The main tasks proposed in this section are:
Entering the Mold Design workbench
Retrieving Part
Defining the Mold Base
Positioning Part
Splitting the core and the cavity
Inserting components
Positioning components on the base
Creating a gate
Creating a runner
Creating a coolant channel
Saving data
Version 5 Release 10
Mold Tooling Design
Page 6
Entering the Mold Tooling Design Workbench
This task shows you how to enter the Mold Tooling Design workbench.
1.
Select the Start ->Mechanical Design -> Mold Tooling Design command to open the required workbench.
The Mold Design workbench is now active:
Mold Tooling Design
Version 5 Release 10
Note that "Product" is displayed in the specification tree.
Page 7
Version 5 Release 10
Mold Tooling Design
Page 8
Retrieving the Part
This task shows you how to retrieve the part to mold.
1. Double-click on 'Product1' in the specification tree to make it active.
It is now displayed in orange.
2. Select the Insert->Existing Component command from the main menu bar.
Open the GettingStarted01.CATPart file from the samples directory.
This is the part to be molded:
Mold Tooling Design
Version 5 Release 10
Page 9
Note that the Part is now mentioned in the specification tree.
The part file must contain the part itself along with all the surfaces required for
the core cavity separation.
The part number (in the properties) must be MoldedPart.
Version 5 Release 10
Mold Tooling Design
Page 10
Defining the Mold Base
This task shows you how to create and define a mold base.
1.
Select the Insert->MoldBase Components >Mold Plates command from the main menu bar or click directly on
the 'New Mold" icon
in the tool bar.
A dialog box is displayed for you to define the parameters of the mold base to be created :
Simultaneously, the outline of a mold base is displayed on the part.
2.
3.
Click on the catalog icon
to open the catalog browser.
Double-click on Dme to select the supplier. Click on the Table button. Scroll down to line 37 and double click on
the reference N3035 in the table (push the Table button to display the table).
Mold Tooling Design
4.
Version 5 Release 10
Press OK.
When the main panel is redisplayed, click the design table icon for the Cavity:
Choose configuration 1319 in the dialog box that is displayed.
Click on OK to validate your choice then repeat this step for the Core.
Page 11
Mold Tooling Design
Version 5 Release 10
5.
Click on OK to validate your selection of the entire mold base.
The outline of the mold base is displayed with a different color for each plate.
6.
Click on OK in the 'Create a New Mold' dialog box for final validation of the mold base.
The mold base is created.
Page 12
Mold Tooling Design
Version 5 Release 10
Note that the mold feature is indicated in the specification tree.
Page 13
Version 5 Release 10
Mold Tooling Design
Page 14
Positioning the Part
This task shows you how to position the part properly with reference to the
mold base you have just created.
There are two axis systems in the viewer and the specifications tree, one
in the MoldedPart and the other in the Mold.
We are going to fit the MoldedPart one to the Mold one.
1.
Click the Snap icon
2.
.
See the Assembly Design manual for more information.
Select the MoldedPart axis system.
Mold Tooling Design
3.
Version 5 Release 10
Page 15
Select the Mold axis system.
You will notice that the phone rises slightly and that there is now only one
axis system visible.
You can also use the Manipulate icon
to position the part manually.
Mold Tooling Design
Version 5 Release 10
Page 16
Splitting the Core and the Cavity
This task shows you how to define and split the core and the cavity on the
molded part.
1. Select the cavity plate in the specification tree with a click on CavityPlate in
the Injection Side of the mold.
2. Open the contextual menu with the right mouse button and select the
CavityPlate.1 object-> Split Component command.
Mold Tooling Design
Version 5 Release 10
Page 17
CavitySurface is given as the proposed
splitting surface in this case because a
surface with this name was found in the
MoldedPart; if no surface with this name
is found (No Selection) you will have to
choose one from the MoldedPart.
The split is automatically performed on the cavity plate.
3. Proceed the same way with the core plate by selecting it from the Ejection
Side in the specification tree and applying a split action via the contextual
menu.
Mold Tooling Design
Version 5 Release 10
No selection is given as the proposed
splitting surface in this case because no
CoreSurface was found in the
MoldedPart. Select CoreSide in the
PartingBody in the specifications tree.
The split action is automatically performed on the core plate.
Page 18
Mold Tooling Design
Version 5 Release 10
Page 19
4. To obtain a better display of the completed split on the cavity and the core
plates, hide the molded part and the injection side display using the
Hide/Show contextual command.
Here is what you should obtain:
Version 5 Release 10
Mold Tooling Design
Inserting Leader Pins in a Mold Base
This task shows you how to insert mold components into a selected mold base.
In this exercise you will insert 4 leader pins that will be positioned on already existing points.
1. Click on the Add Leader Pin icon
.
2. Use the browser to open the associated catalogs and select the Dme supplier:
Continue into detailed definition of the leader pin with the following selection:
Page 20
- Xem thêm -