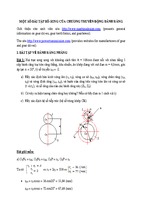
Tài liệu training tiếng anh cho máy CMM mitutoyo nhé
GEOPAK Win
3D CNC
Coordinate Measuring Machine
Training Manual
Version 4.00
Mitutoyo Asia Pacific Pte. Ltd.
MCOSMOS
GEOPAK Win Training Manual
Table of Contents
1.
Page
CMM introduction……………..…………………………….………………..1
To activate CMM ........................................................................................... 1
To shut-down CMM ...................................................................................... 2
To Configure or to modify an existing CMM configuration……………..3-12
To Understand the functionality of Joystick ................................................ 13
2.
Introduction to Geopak-Win -Layout of Main Windows..................................14
-Layout of Part Windows....................................15
3.
Introduction to LearnMode....……....…...…………..……..........……………16
3.1
Startup Learn Mode………………………………………..……………….16-17
3.2
Probe Data Management-To Setup the Probe System............................18-21
3.3
-To Create Probe(s) on different Angles..........22-25
3.4
-Probe Calibration ..........................................26-30
3.5
To Change the Learn Mode Start up Setting............................................31-33
3.6
To Change Units of Inches or Metris / Decimal points.............................33-34
4.
GEOPAK-Win Layout Introduction...............................................................35-37
5.
GEOPAK-Win General icons for measurement..............................................38-39
6.
GEOPAK-Win Minimum measuring points.........................................................39
7.
GEOPAK-Win Coordinate System.................................................................40-43
8.
Creating P.C.S. setting "Pattern Alignment" method.......................................43-53
9.
Creating P.C.S setting using single step "Step by step" method..............................54
9.1
Example1 (Plane, Line, Line) setting.........................................................54-58
9.2
Example 2 (Plane, Circle, Circle) setting....................................................59-61
9.3
Example 3 (Plane, Circle, Line) setting.......................................................62-66
9.4
Example 4 (Plane, Symmetry Line) setting.................................................67-73
9.5
Example 5 (Plane Circle 1 & Circle 3) (Single Offset) setting....................74-76
10. P.C.S - Move/Transfer datum or Rotate axis of Coordinate System...................77-83
11. Introduce to Element commands.........................................................................83-85
13. Measuring elements
Point...........................................................................86-99
13.
Line........................................................................100-111
14.
Circle......................................................................113-134
15.
Plane....................................................... ...............135-139
16.
Cone...............................................................................130
17.
Sphere.....................................................................131-133
18.
Cylinder....................................................... ..........134-138
19.
Step Cylinder..........................................................139-140
20. Two types of computation element...................................................................141-149
21.
Angle......................................................................150-154
22. Minimum/Maximum Calculation.....................................................................155-157
1.1
1.2
1.3
1.4
MCOSMOS
GEOPAK Win Training Manual
23.
24.
25.
26.
27.
28.
29.
30.
31.
33.
33.
34.
35.
36.
37.
38.
39.
40.
41.
43.
43.
44.
45.
46.
47.
48.
49.
50.
51.
53.
53.
54.
55.
56.
57.
58.
59.
60.
61.
63.
63.
64.
65.
66.
67.
Geometric Dimensioning and Tolerancing (GD&T) introduction..........................158
Concentricity tolerance comparison.................................................................158-161
Coaxiality tolerance comparison......................................................................163-163
Parallelism tolerance comparison.....................................................................164-168
Perpendicularity tolerance comparison............................................................169-171
Angularity tolerance comparison......................................................................173-174
Symmetry tolerance comparison......................................................................175-177
Runout tolerance comparison...........................................................................178-183
Positioning or True Position (T P)....................................................................183-196
Cartesian, Cylindrical & Spherical Mode setting.............................................197-200
To save measurement data................................................................................201-203
To print measurement data...............................................................................204-207
Part Program – Manual part program (Part without Clamping Fixture)..........208-218
-- Manual part program (Part with Clamping Fixture)...............219-235
-- CNC part program (Part without Clamping Fixture)..............236-236
-- CNC part program (Part with Clamping Fixture)....................237-250
-- Edit Part Program....................................................................251-253
-- To Repeat Part Program...........................................................253-255
Loop Start & Loop End application.................................................................256-258
Coordinate RPS (Reference Point System) Alignment.....................................259-263
Part Manager Icons............................................................................................264-273
General setting...................................................................................................274-276
Graphic of elements...........................................................................................277-280
- Using Windows Explorer................................................................281
- Windows style file browser.............................................................283
- Advanced user administration.........................................................283
- CMM system manager (CSM)................................................284-286
- GEOPAK user interface...........................................................287-288
- Recalculate Circle and Ellipse.........................................................289
- Tolerance command use measured point only.................................290
- Signed angle calculation..................................................................291
- Datum Origin setting on Hole shape...............................................293
- Polar measurement..........................................................................293
- Tolerance.........................................................................................294
- Output of single point element........................................................294
- Theoretical Ellipse..........................................................................295
-Measuring rounded corners.......................................................296-298
- GEOPAK toolbars....................................................................299-300
Additional Information & Maintenance
- MCOSMOS Version 4.00 software................................................301
- Air Supply......................................................................................303
- Prevent Oil / Dust / Paper / Staple.................................................303
- Head Probe condition ...................................................................303
- Cable and Dongle..........................................................................303
- Temperature and Humidity............................................................303
MCOSMOS
GEOPAK Win Training Manual
68.
- Loading heavy work pieces...........................................................303
69.
- Vibration........................................................................................303
70.
- Air conditioning.............................................................................303
71. Setting on "Position of Machine" display.................................................................304
73. Template AS 9103 form 3 for Aerospace Industries..................................................305
73. Exercises
Exercise 1............................................................................................306
Exercise 3...........................................................................................307
Exercise 3...........................................................................................308
Exercise 4...........................................................................................309
Exercise 5...........................................................................................310
Exercise 6...........................................................................................311
Exercise 7...........................................................................................313
Actual work piece / Memo..................................................................313
Revision Amendment Note
Drafted by David Chau
Version 4.00
MCOSMOS
GEOPAK Win Training Manual
1. CMM introduction
1.1 To activate CMM
To start-up CMM, procedures are as follow:
• Turn "ON" the air dryer.
• Turn "ON" the air compressor.
• Turn "ON" the CMM, the joystick control box "STATUS" LCD will display “Abso”
indication. Press "START" button on the joystick control box to initialize CMM, the
joystick control box "STATUS" LCD will show 100 (% of speed) after initialization.
By turning the "SPEED" control nut will increase or decrease the % of speed.
Note: The above with joystick box control box application only applicable on
CNC-CMM.
• Turn "ON" the P.C. system.
• Double click on the "MCOSMOS" icon as shown below:
Page 1
MCOSMOS
GEOPAK Win Training Manual
1.2 To shut-down CMM
To shut-down CMM,
• “Parking” the Head Probe to CMM home position, click "Move" & "P" icon, Ok:
•
•
•
•
Exit out from GEOPAK-Win menu.
Turn "OFF" CMM.
Shut-down P.C. system.
Turn "OFF" the air dryer & compressor.
Note: If the joystick control box status screen does not show “Abso” after turning "ON"
CMM, possible "Error" could be happening.
Example:
1.) If air supply lesser then 4 Pa (0.4MPa), error code of "E650" will be
displayed on "STATUS" LCD.
2.) If emergency button has been pressed on, error code of "E899" will be
displayed on "STATUS" LCD.
Others error code; if happening during start up, kindly refer to CMM Manual
hand book for troubleshooting tips or contact Mitutoyo for advice.
Page 2
MCOSMOS
GEOPAK Win Training Manual
1.3
•
To configure or modify an existing CMM configuration
Click
"Settings" menu, CMM System Manager:
The “CMM System Manager” starts the Machine Builder to add on a new configuration or
to modify an existing CMM configuration.
The Machine Builder displays a selection list of CMM types and sizes and previews the
selected CMM in a 3D graphical display window.
•
Click “Add CMM configuration” icon
•
Key in CMM model at “Add CMM configuration” menu, Example: Crysta Apex S
574, Ok.
Page 3
MCOSMOS
GEOPAK Win Training Manual
•
Select CMM model.
•
•
Add "rotary table" , Note: If "rotary table" unavailable, click "Continue",
Page 4
MCOSMOS
GEOPAK Win Training Manual
•
Add Master Ball, key in ball diameter size, Ok.
•
•
Add Rack Changer, example: SCR300.
Note: If Rack Changer unavailable, click "Continue".
Page 5
MCOSMOS
GEOPAK Win Training Manual
•
Added Rack Changer, click "Continue".
•
Configure Head probe system on to SCR 200 Port 1, Tree 1 location.
Example: Combination of PH10M, PAA1, TP200.
PAA1
TP200
•
TP200_SF selection.
•
Stylus selection.
Page 6
MCOSMOS
GEOPAK Win Training Manual
•
•
•
Specify Probe configuration of Port 1 of probe tree no.1 for SCR200.
"Mouse" right click on:
Port 1: TP200 SF \ Define Probe tree
Click "Ok".
TP200 SF
•
Specify Probe configuration for Port 2, TP 200_ LF.
Port 3: TP200_ LF \ Port setting.
TP200_LF
Page 7
MCOSMOS
GEOPAK Win Training Manual
•
Define Port 2 of probe tree no.2, click "Ok".
Port 2: TP200_LF \
Define probe tree
•
Example: Probe configuration on Port 2, tree no.2.
PH10M \ PAA1 \ TP200 \ TP200_LF \ Stylus
Page 8
MCOSMOS
GEOPAK Win Training Manual
•
Probe configuration completed for Port 1 & 2.
Page 9
MCOSMOS
GEOPAK Win Training Manual
•
CMM configuration file created.
•
To modify configuration, use "Mouse" right click on icon, select "Modify".
Page 10
MCOSMOS
GEOPAK Win Training Manual
•
Example: Modify Master Ball diameter.
•
The Offline configuration is of "no linking" status with CMM.
Page 11
MCOSMOS
GEOPAK Win Training Manual
•
Description of Probe configuration.
1
5
2
3
6
4
7
8
1) Probe Collar
2) Sensor Mounting
3) Total Length
4) Swivel Length
5) Motorized Head Probe - PH10M
6) Auto-Changer - PAA1
7) Touch Probe – TP200
8) Stylus
Page 12
MCOSMOS
GEOPAK Win Training Manual
1.4 To understand functionality of Joystick
LEFT, BACK, RIGHT
- To register different control position of joystick control
box on X / Y / Z axis movement.
X-FUNC, Y-FUNC,
Z-FUNC
- To control individual axis of X / Y / Z measuring position
on the positive direction.
X-LOCK, Y-LOCK,
Z-LOCK
- To lock individual axis of X / Y / Z measuring position
on determined level.
MEAS
- To measure & collecting measuring point.
T.S (Touch Signal)
- Trigger to “ON” / “OFF” mode particularly for changing
stylus.
GOTO
- use on CNC part programming for activating / registration
of intermediate position.
EMERGENCY
- To immediate stop the machine movement (system need
to restart again and all information will be eased).
R.STOP
- Stop the machine movement while not ease the existing
information.
SPEED
- To control the movement speed.
FINE
- To control very precise movement, basically for optional
optical microscope application.
Page 13
MCOSMOS
GEOPAK Win Training Manual
2. Geopak-Win software introduction
Main Windows Layout
1
2
3
4
1) Software Version
: Software version released reference.
2) "Text" menu
: Functionality on the pull down menu. Example: "Part",
"Settings", "View", "User", "CMM" (Coordinate
Measuring Machine), "Statistics", "Tools", "Windows", and
"Help".
3) "Icon" menu
: Frequently used function, Example: "CMM learn mode",
"CMM Repeat Mode" or "3D-TOL", of pull down menu, in
which are displayed in graphical form.
4) Part Management Tool : Organization of parts. Example: Create a New Part,
Change part name, Mark part, Delete part.
Page 14
MCOSMOS
GEOPAK Win Training Manual
Layout of Part Windows
1
2
3
1) Directory
: Folder Directory for created Part name.
2) Part name
: Part information.
3) Timing
:
Part created / modified timing information.
Page 15
- Xem thêm -