Mô tả:
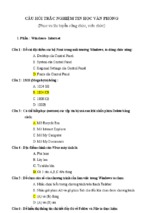
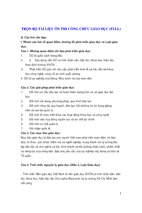
CATIA V5R19 - surface modeling – Rebuild Audi R8
CATIA V5 Surface-modeling
(Tutorial 8- Rebuild Audi R8)
Not For Commercial Use
Surface-modeling
Design with a Master Model
Design in Context
A- 1
Version 1a- Oct 2010
Non-Commercial Use
Written by Dickson Sham
CATIA V5R19 - surface modeling – Rebuild Audi R8
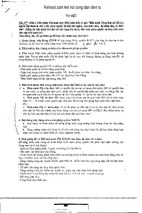
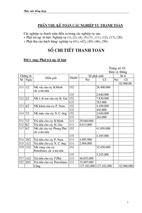
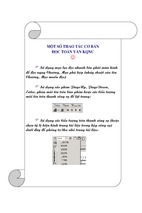
Design Intent
Hard fillet
Hard fillet
PictureSource: www.audi.com/r8
Fillet disappears
Fillet
disappears
soft fillet Hard fillet
Grab photos from internet
(in different views)
A- 2
Version 1a- Oct 2010
Non-Commercial Use
Written by Dickson Sham
CATIA V5R19 - surface modeling – Rebuild Audi R8
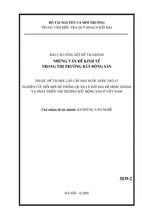
Not For Commercial Use
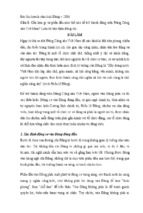
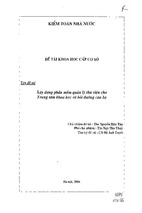
Wheelbase = 2650
Length = 4431
Width, Max w/o mirrors = 1904
Height = 1249
Tread Width, Front = 1632
Tread Width, Rear = 1595
Front Wheel Size (in) = 19 x 8.5
Rear Wheel Size (in) = 19x 11.0
Front Tire Size = P235/ 35R19
Rear Tire Size = P305 / 30R19
A- 3
Version 1a- Oct 2010
Non-Commercial Use
Written by Dickson Sham
CATIA V5R19 - surface modeling – Rebuild Audi R8
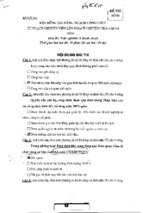
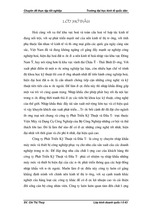
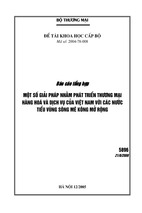
Surface-modeling
Design with a Master model
Tutorial 8A
–
–
Insert 2d pictures and reposition them on offset planes
Create 3D control curves
Not For Commercial Use
Tutorial 8B,C, D
–
–
–
–
Create the front body of the master model
Create the middle body of the master model
Create the rear body of the master model
Create parting surfaces
Tutorial 8E
–
–
Split the finished (master) model into separate parts
Build more details on each part
Tutorial 8F
–
Reassemble them together
Please be reminded that this series of tutorials is designed
to demonstrate a design approach with CATIA, rather than
the command itself.
A- 4
Version 1a- Oct 2010
Non-Commercial Use
Written by Dickson Sham
CATIA V5R19 - surface modeling – Rebuild Audi R8
Tutorial 8A
•
Pic1.jpg
Create a new project folder
(e.g. C:\Car_R8)
Pic2.jpg
Before Start:
http://models.audiusa.com/r8
•
Crop the picture (972.jpg) into two jpeg files in a
square size (just extracting four views: front, left,
top & back)
•
Save the files into the project folder
•
•
•
•
•
•
Start CATIA
File/New/ Part
DO NOT SELECT “Hybrid Design”
Switch Workbench to Generative Shape Design
Insert a geometrical set “reference”
Create 4 offset planes
3500mm
6000mm
3500mm
3500mm
A- 5
Version 1a- Oct 2010
Non-Commercial Use
Written by Dickson Sham
CATIA V5R19 - surface modeling – Rebuild Audi R8
Tutorial 8A
•
•
•
•
•
•
Create 4 Extruded Surfaces on offset planes
(4431mm x 1249mm , start from origin)
(2000mm x 1249mm , symmetric)
(2000mm x 1249mm , symmetric)
(2000mm x 4431mm , start from origin)
Apply any material onto each surface, then change
the texture to our prepared jpeg files (pic1. jpg or pic2.
jpg)
4431mm
1
1249mm
Scale & Position the image to match the surface‟s size
•
•
Make them semi-transparent
Set the Geometrical set “Reference” to
“Unpickable”
A- 6
Version 1a- Oct 2010
Non-Commercial Use
4
1249mm
3
2000mm
2
2000mm
•
4431mm
2000mm
1249mm
Written by Dickson Sham
CATIA V5R19 - surface modeling – Rebuild Audi R8
Tutorial 8A
•
•
•
•
•
•
Switch workbench to “Shape/ Freestyle”
Insert a NEW geometrical set “control_curves”
Set “Lock Privileged Plane Orientation Parallel to
Screen” on compass
Create some 3d curves (left side only)
No curve blending or trimming
Thicken the curves and change color to PINK
Drag a control point to
modify the spline
Not For Commercial Use
Just create the left
A- 7
Version 1a- Oct 2010
Non-Commercial Use
Use minimum number of control
points to create a spline
Written by Dickson Sham
CATIA V5R19 - surface modeling – Rebuild Audi R8
Tutorial 8A
Total
19 curves
A- 8
Version 1a- Oct 2010
Non-Commercial Use
Written by Dickson Sham
CATIA V5R19 - surface modeling – Rebuild Audi R8
Front Body
(master)
Tutorial 8B
•
Switch workbench to “Generative Shape Design”
•
Insert a NEW geometrical set “Front_body”
•
•
•
Make a point on curve
Make an point on the neighbor curve
Connect curve (curvature continuous, trim
elements)
Adjust the points to get a smooth trimmed curve
•
•
•
•
Complete the above steps to make two more
trimmed curves (as shown)
Result
Create an offset plane
(Reference YZ plane, Offset 1495mm)
Split the trimmed curve into two
Offset
plane
A- 9
Version 1a- Oct 2010
Non-Commercial Use
Written by Dickson Sham
CATIA V5R19 - surface modeling – Rebuild Audi R8
Front Body
(master)
•
•
•
Tutorial 8B
Create an offset plane from the bottom
(Reference xy plane, Offset 232mm)
Split the curve by the plane (to remove the bottom portion)
Split another curve (to remove the bottom portion)
split
Symmetry
Curve
•
•
•
Mirror the curve
Create a 3d spline (linking 3 endpoints)
Create another 3d spline
•
Create a multi-sections surface
3d spline
3d spline
A- 10
Version 1a- Oct 2010
Non-Commercial Use
Written by Dickson Sham
CATIA V5R19 - surface modeling – Rebuild Audi R8
Front Body
(master)
Tutorial 8B
Not For Commercial Use
•
Create a sketch
(on XZ plane, right view)
(three arcs, tangency continuous)
•
Create another sketch (YZ plane, front view)
–
•
Draw a spline
Create a Combined curve
Combine
curves
A- 11
Version 1a- Oct 2010
Non-Commercial Use
Written by Dickson Sham
CATIA V5R19 - surface modeling – Rebuild Audi R8
Tutorial 8B
•
•
Create a Extremum Point on top of combined curve
Create a plane
(Reference: Yz plane, Point: Extremum point)
•
•
•
Create a point on 3d curve
Create a point on 3d curve
Create a Connect curve (trim elements)
•
•
•
Create a sketch on plane (a line, an arc, then fillet)
Create another sketch on the offset plane (an arc)
Create a multi-sections surface
(Coupling Control (optional))
sketch
Version 1a- Oct 2010
Connect
curve
Extremum
point
Coincident with the
3d curve
A- 12
Non-Commercial Use
Written by Dickson Sham
CATIA V5R19 - surface modeling – Rebuild Audi R8
Tutorial 8B
•
Create an extruded surface from a 3d curve
(Direction: xy plane; dimension: 50mm)
•
Create a Swept surface
-
Profile type: Circle
Subtype: 2 guides and tangency surface
Swept
surface
•
Create a Blend Surface
-
•
Define first curve, first support, second curve
Select “Curvature Continuity” for first support
Join the Swept surface & the Blend Surface
Blend
surface
A- 13
Version 1a- Oct 2010
Non-Commercial Use
Written by Dickson Sham
CATIA V5R19 - surface modeling – Rebuild Audi R8
Tutorial 8B
•
Create a sketch on XZ plane
•
Project the sketch on the Join Surface
(Direction: XZ plane)
•
Split the surface by the projected curve
•
Create an offset plane (Reference: Xy plane, Point:
endpoint
)
point
•
•
Create a point on the combined curve
Create another point on the projected curve
•
•
Create two split curves
Create a blend surface
point
plane
A- 14
Version 1a- Oct 2010
Non-Commercial Use
Written by Dickson Sham
CATIA V5R19 - surface modeling – Rebuild Audi R8
Tutorial 8B
•
Create a Connect curve (Curvature Continuous
at both ends)
•
•
•
Create a point on the edge
Create a boundary curve
Create a multi-sections surface (2 sections, 2
tangent faces, 1 guide)
•
Create a Parallel Curve (offset 70mm, upward)
Point
Multi-sections
surface
Boundary curve
Not For Commercial Use
A- 15
Version 1a- Oct 2010
Non-Commercial Use
Written by Dickson Sham
CATIA V5R19 - surface modeling – Rebuild Audi R8
Tutorial 8B
•
•
•
•
Project the parallel curve on the multi-sections
surface
Split the surface by the projected curve
Create a Fill Surface (Curvature continuous)
(Check the resultant surface; if not smooth,
modify the corresponding curves/sketches)
Fill
surface
Create an offset plane
– Reference: Yz plane,
– offset = 1500mm
A- 16
Version 1a- Oct 2010
Non-Commercial Use
Written by Dickson Sham
CATIA V5R19 - surface modeling – Rebuild Audi R8
Tutorial 8B
•
Join surfaces
•
Split the join surface into Two (by the offset plane)
(Keep both sides)
•
Split the resultant curve into Two (by the offset plane)
Keep both
•
Create a line (point – point)
Keep both
line
A- 17
Version 1a- Oct 2010
Non-Commercial Use
Written by Dickson Sham
CATIA V5R19 - surface modeling – Rebuild Audi R8
Tutorial 8B
•
–
–
–
•
•
Line
Create a swept surface
Profile : Line
Guide Curve: Split Curve
Surface: Multi-sections Surface
Multi-sections
Surface
Split Curve
Line
Create a boundary curve
Create a swept surface
–
–
–
Profile : Line
Guide Curve: Boundary Curve
Surface: Split Surface
Boundary
Curve
Split Surface
•
Create a blend surface
–
–
tangent continuous on both sides
tension 0.8, 1.0
Tension 0.8
Tension 1.0
A- 18
Version 1a- Oct 2010
Non-Commercial Use
Written by Dickson Sham
CATIA V5R19 - surface modeling – Rebuild Audi R8
Tutorial 8B
•
Create surface-surface fillets (R25mm) twice
Not For Commercial Use
•
Extract two edges (tangency continuity)
fillet
•
Split the fillet surface into THREE
1
3
2
A- 19
Version 1a- Oct 2010
Non-Commercial Use
Written by Dickson Sham
CATIA V5R19 - surface modeling – Rebuild Audi R8
Tutorial 8B
•
Create a sketch (on Yz plane)
–
Projected curves
Draw a straight line
•
Project the sketch onto the two split
surfaces
•
Create a connect curve
(Tangency Continuity on both ends)
Projected curves
Projected curves
Connect Curve
(Front view)
Connect Curve
A- 20
Version 1a- Oct 2010
Non-Commercial Use
(Top view)
Written by Dickson Sham
- Xem thêm -