Teach Yourself
Webdesign
Photoshop
by Carlos Alemán
Published by Carlos Aleman
© 2014 Carlos Alem án
No part of this publication may be reproduced, stored in a retrieval
system of transmitted in any form or by any means, electronic,
mechanical, photocopying, recording, scanning or otherwise, except
as permitted under Sections 107 or 108 of the 1976 United States
Copyright Act.
Warning and Disclaimer
This book is sold as is, without warranty of any kind, either
expressed or implied. While every precaution has been taken in the
preparation of this book, the publisher and author assume no
responsibility for errors or omissions. Neither is any liability
assumed for damages resulting from the use of the information or
instructions contained herein. It is further stated that the
publisher and author are not responsible for any damage or loss to
your data or your equipment that results directly or indirectly from
your use of this book.
Trademark Acknowledgments
All terms mentioned in this book that are known to be trademarks or
service marks have been appropriately capitalized. The Publisher
and author cannot attest to the accuracy of this information. Use
of a term in this book should not be regarded as affecting the
validity of any trademark or service mark.
Photoshop and Dreamweaver are trademarks of Adobe, Inc.
iPod and iPad are registered trademarks of Apple Computer.
Windows is a registered trademark of Microsoft Corporation.
CarlosAleman.com
Firstly, I’d like to thank you for purchasing this book.
You may find this a
rather odd book in that it is written by an artist and not a technical person.
But if you prefer teaching yourself new things, you might also be artistic in
your way of thinking.
Either that or you want to save money on courses.
Instead of writing a long boring introduction, let us dive right into learning
to design a website.
I will assume that this is all new to you, so I’ll
introduce you to two Adobe® products, Photoshop® and Dreamweaver®.
Since you
may not want to run out and buy the latest version, I’ll use older versions in
my examples.
I’ve noticed over the years that each new version adds
functionality, but doesn’t usually make drastic changes to the user interface,
so it’s never been that difficult to adapt to a slightly different look.
However, it may help your resume to list the latest software.
Adobe® allows
you to download free trials and/or pay on a monthly basis.
The Adobe® versions I will be using in this book is CS (Creative Suite).
latest version is CC (Creative Cloud).
The
If you eventually decide to get CC,
you’ll find that it is cloud based and will work alongside CS, and you can
backsave to CS formats.
You can even install prior versions from an archive
starting with CS6 onwards.
With Dreamweaver® CC it is easier to design for
multiple screens and devices as well edit CSS.
sharpening and many other new powerful effects.
Photoshop® CC features smart
But for the purpose of
learning the basics of web design, the less sophisticated CS versions may be a
good starting point.
One thing I should mention first.
charge a fee.
Websites require web hosting which usually
I once had a person read an entire tutorial and was upset to
discover this to be true at the end.
Once a site is created, if you want it to
be viewable by the public, you’ll need to upload your files to a web server.
You can, however, preview most of your web design work on your computer or a
network.
Also, please note that I will be using Windows as the operating system (Mac users
will have to find alternate keyboard shortcuts)
I learn by doing.
So in this book, I will teach you Photoshop® basics by
having you render an Apple iPad, and Dreamweaver® by having you create a mock
website.
process.
Along the way, I will give you useful information about the design
Learning Photoshop® by rendering an Apple iPad
With Adobe® Photoshop®, not only can you create amazing affects with
photography, you can render just about anything you can imagine without ever
using a photograph. To give you an idea how powerful a graphics program
Photoshop® is, you can use it to draw a convincing looking gadget/user
interface: the Apple iPad.
By the time you finish rendering this iPad, you will be quite familiar with the
Photoshop® user interface and its tools.
graphics, and ready for web design.
You’ll also be proficient in creating
In Photoshop® there are always numerous ways to accomplish each task. I'll
share my heuristics (techniques for problem solving) with you with many screen
captures as I work to build, layer upon layer, a two dimensional representation
of a three dimensional object.
First, I'm going to open a new window (File>New) and set the width at 1024 and
the height at 768. The resolution will be 72 pixels per inch. Make sure you are
working in RGB color mode.
Save the project as a .psd file.
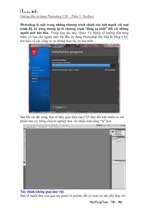
There are many ways to set up your palettes. I prefer to group a few palettes
together with the 'Layers' palette visible. Click on the 'Create a New Layer'
button on the layers palette next to the trash icon. This will create layer 1.
Hold down the rectangle tool from the tool bar and switch to the 'Rounded
Rectangle Tool.'.
Once the Rounded Rectangle Tool is selected, you'll notice that the options
will appear above just under the main menu. Make sure that the Fill Pixels
button is selected. Set the radius at 35 pixels, mode normal, opacity 100% and
make sure that Anti-alias is checked.
Draw a rectangle using the foreground color (which should be set to black by
default). Draw an aspect ratio that you think is consistent with an iPad.
Double click on Layer 1 to launch the Layer Styles window. Check the Gradient
Overlay check box on the left.
Click on Gradient Overlay to toggle to the gradient options. Set the angle to
0. Click on the gradient strip to launch the gradient editor. Click on the
bottom left 'Stop' to launch the 'Select stop color' window. Choose a light
gray. I've chosen d5d6d7.
Choose another light gray for the right Stop. And then create another Stop by
clicking in the middle of the gradient strip. Make the middle stop a much
lighter gray. Click okay on the gradient editor.
Now to create the illusion of a rounded edge, in the Layer Style window, select
Inner glow. Blend mode should be normal. Opacity 75%. Choose a dark gray color
from the color picker. The size should be 4.
Duplicate Layer 1 by dragging it to the Create New Layer button in the Layers
palette. Resize 'Layer 1 copy' (Edit>Transform>Scale). In the options above,
set W: at 99% and H; at 98.50. Click enter.
The two rectangles will work together to create the illusion of a thin rounded
metallic edge. Double click 'Layer 1 copy' to launch the Layer Style window. In
addition to the inner glow, this rectangle will also have an outer glow. Use a
dark gray. Set the size to 2.
Click Color Overlay and choose black from the color picker.
Create layer 2. Select the Rectangular Marquee Tool or simply push down the M
key. Select an area approximately the proportions of the iPad screen.
Fill with the background color (Which should be white by default) by selecting
Alt/Delete or Edit>Fill..
Double click layer 2 to launch the Layer Style window. Set the Color Overlay to
black. Select Bevel and Emboss. Style is Outer Bevel. Technique is smooth.
Direction is Up. Size is 5. This will be the first shading effect, so it's okay
to leave the 'Use Global Light' option checked. For Highlight Mode and Shadow
Mode choose gray, opacity 75%. Click Okay.
- Xem thêm -