PublicIP Wireless WiFi
Hotspot
Control System
Documentation
Documentation By:
In Collaboration With:
Reviewed By:
Gary N. McKinney (gm…)
Scott Tully (Wi-Phi)
Jim Shope (jshope)
Preface:
The world of communications is an ever-changing place. Gone are the days of riding horse-back for
miles to deliver messages from far off places. Gone are the days of being a slave to telephone
system that rely on wires for connectivity.
Enter the Wireless Age!
Today’s communications capabilities far exceed what was envisioned just fifty years ago – Phone
calls now follow people around instead of people having to stay in one place to receive the calls.
Information is now transmitted around the world at light-speed instead of being read about a few days
or months later in the newspaper. We have entered the Information and Communications Age!
A new step in the quest for faster and faster access to information, which has caused an explosion of
information accessibility, has been the advent of the Internet. You can now view events around the
world almost as fast as they happen, access a great amount of information on just about any subject
in great detail, communication with people on the other side of the world with many forms of
information (pictures, graphs, charts, text, and even real-time voice). The Internet, in my opinion will
be looked upon as one of the driving forces behind the true Information Age!
To truly realize the potential of the Internet requires the freedom of mobility such as the cell-phone
has done for the telephone communications between people. Mobility allows a person to interact with
the environment instead of being strapped to single fixed locations and interacting in just those
locations. Cell-phones have empowered people with the ability to move around within their
environment – not strapped to a cable to send and receive communications. The same needs to be
done for the Internet in a way that is simple to use, reliable and easy to maintain at a very
inexpensive cost!
Enter the Public IP WiFi Wireless Access System!
Gary N. McKinney
Table of Contents
PublicIP System Overview...................................................................................................................... 6
What is the PublicIP System? ............................................................................................................................... 6
Why Use the Public IP System? ............................................................................................................................ 7
How does it work?................................................................................................................................................ 8
Suggested Network Configuration......................................................................................................................... 9
Complex ZoneCD Implementation...................................................................................................................... 10
Control Your Users! ........................................................................................................................................... 11
“Who” ............................................................................................................................................................... 11
“What”............................................................................................................................................................... 11
“When”.............................................................................................................................................................. 12
“Where”............................................................................................................................................................. 12
Zone Control Features .......................................................................................................................... 13
Creating a Zone Control Master Account............................................................................................................. 16
The Public IP Control Server Login screen:......................................................................................................... 16
The Public IP Control Server Login screen (Alternate Access):............................................................................ 17
Create Master Account – Step 2 .......................................................................................................................... 19
Create Master Account – Step 3 .......................................................................................................................... 20
Master Account Function Links .......................................................................................................................... 22
Master Wizard Setup............................................................................................................................. 23
Get Started Webpage .......................................................................................................................................... 23
Time Zone Web Page ......................................................................................................................................... 24
Open & Close Web Page .................................................................................................................................... 25
Branding Web Page............................................................................................................................................ 26
Login & Registration Screen Style Web Page...................................................................................................... 27
Setup Remote Login - Custom Page Source:........................................................................................................ 29
Zone Custom Login Page Creation:................................................................................................................ 30
User Registration Allowed - Page 1................................................................................................................ 35
User Registration Allowed – Registration Name Validation ............................................................................ 37
Use Custom Registration Form Page .............................................................................................................. 38
User Registration Not Allowed Selection: ...................................................................................................... 40
Protected Class Settings:................................................................................................................................ 43
Bandwidth Management Selection Page:............................................................................................................. 47
Bandwidth Total Usage Selections:................................................................................................................ 48
Classification Bandwidth Thru-put Setup Page: .............................................................................................. 49
Anonymous Client Access Configuration Page:................................................................................................... 50
Local Network Access Options Page:.................................................................................................................. 52
Zone Wizard Overview .......................................................................................................................... 56
Zone Types: ....................................................................................................................................................... 56
Creating a New Zone..................................................................................................................................... 57
Zone Creation Complete!............................................................................................................................... 60
One of Each Zone Type Created ......................................................................................................................... 62
Zone Management Display – Main Page ............................................................................................................. 66
Zone Control Configuration Display ................................................................................................................... 67
Downloadable Reports Generation:................................................................................................................ 71
Zone MAC Access Control................................................................................................................................. 72
User Management – Manually Adding Users to a Zone........................................................................................ 74
Editing a Client’s Account in a Zone................................................................................................................... 76
Summary of the Zone Creation and Management: ............................................................................................... 77
Zone Creation ............................................................................................................................................... 77
Zone Management......................................................................................................................................... 78
ZoneCD Gateway Server Operation...................................................................................................... 79
NoCat Captive Portal.......................................................................................................................................... 79
Open Mode ................................................................................................................................................... 79
Closed Mode................................................................................................................................................. 80
DansGuardian Content Filtering.......................................................................................................................... 81
ZoneCD Features .................................................................................................................................. 82
System Requirements........................................................................................................................... 86
ZoneCD Startup Sequence – Picking Oneself Up By the Shoelaces...................................................................... 87
Stage-1 – Initial Startup ................................................................................................................................. 88
Stage-2 – System Configuration..................................................................................................................... 89
Stage-3 Final Configuration ........................................................................................................................... 89
Morphix vs. Knoppix..................................................................................................................................... 89
Morphix system Description .......................................................................................................................... 89
/base ............................................................................................................................................................. 90
/mainmod...................................................................................................................................................... 90
/minimod ...................................................................................................................................................... 90
/exec ............................................................................................................................................................. 91
/copy............................................................................................................................................................. 91
/deb............................................................................................................................................................... 91
PublicIP Initialization Sequence..................................................................................................................... 92
ZoneCD Bootup and Configuration – What you see…And What You Do…......................................... 94
Initial Bootup Splash Screen Display .................................................................................................................. 94
Morphix Initial Bootup Information Display........................................................................................................ 95
USB Formatting Utility Input Display................................................................................................................. 96
USB Device Formatting Utility Information Display ........................................................................................... 97
ZoneCD Gateway Server License Acceptance Input Display................................................................................ 98
ZoneCD Writable Media Not Found Error Display .............................................................................................. 99
ZoneCD Gateway Welcome & Setup Utility Configuration Input Display .......................................................... 100
ZoneCD Gateway Open or Closed Mode Selection Input Screen........................................................................ 101
Open Mode Web Content Filtering Selection Input Display ............................................................................... 102
Open Mode Web Site Home Page Redirect Entry Input Display......................................................................... 103
ZoneCD Gateway Display Run Mode Selection Input Display ........................................................................... 104
ZoneCD eth0 Interface Network Configuration Mode Setup Input Display......................................................... 105
Eth0 Static IP Setting Input Display .................................................................................................................. 106
Eth0 Static IP Netmask Setting Input Display.................................................................................................... 107
Eth0 Static IP Gateway Address Setup Input Display......................................................................................... 108
ZoneCD Static IP Mode Primary DNS Setup Input Display ............................................................................... 109
ZoneCD Static IP Mode Secondary DNS Setup Input Display............................................................................ 110
ZoneCD Zone Control Server Closed Mode Login Username Input Display....................................................... 111
ZoneCD Zone Control Server Closed Mode Login Password Input Display........................................................ 112
ZoneCD Zone Control Server Login Invalid Username/Password Display.......................................................... 113
ZoneCD Mode Configuration Finished Display ................................................................................................. 114
ZoneCD Re-Boot Configuration Utility Display ................................................................................................ 115
ZoneCD Re-Boot Geographic Area Selection Display ....................................................................................... 116
ZoneCD Re-Boot Time-Zone Selection Display ................................................................................................ 117
ZoneCD Re-Boot Time-Of-Day Setting Selection Display................................................................................. 118
ZoneCD Final Configuration Screen Display..................................................................................................... 119
ZoneCD Gateway Server LessX Display Screen................................................................................................ 120
ZoneCD Gateway Server GUI Display Screen................................................................................................... 121
ZoneCD Gateway Server Command Line Display Screen .................................................................................. 122
ZoneCD Gateway Server Configuration Final Notes:......................................................................................... 123
ZoneCD Tips and Tweaks ................................................................................................................... 124
Overview ......................................................................................................................................................... 124
How to Set up a Custom Open Mode Splash Screen .......................................................................................... 126
How To Set up Secure Shell for Remote Access ................................................................................................ 128
How To Configure Non-Authenticated Access ................................................................................................. 131
How to “Fix” a Dead Cat!................................................................................................................................. 134
Tips and Tweaks ZoneCD – Notes and Observations:........................................................................................ 137
Appendix A – Custom Login Web Pages............................................................................................ 144
File name: login.asp.......................................................................................................................................... 144
File name: checklogin.asp................................................................................................................................. 146
File name: _dbopen.asp .................................................................................................................................... 147
File name: _dbclose.asp.................................................................................................................................... 148
Appendix B– Custom Registration Pages .......................................................................................... 150
File name: _dbopen.asp .................................................................................................................................... 150
File name: _dbclose.asp.................................................................................................................................... 150
File name: registration.asp ................................................................................................................................ 151
File name: style.css........................................................................................................................................... 154
File name: register_submit.asp.......................................................................................................................... 156
File name: register_result.asp............................................................................................................................ 158
File name: db.sql .............................................................................................................................................. 160
Appendix C - “How To” Modify the ZoneCD Image ............................................................................ 161
Hardware and Software Requirements............................................................................................................... 161
Steps Required to Decompress the ZoneCD ISO Image file ............................................................................... 162
Making Changes To the ZoneCD System .......................................................................................................... 163
Creating a ZoneCD Gateway Server Bootable CD-Rom ISO File.................................................................. 164
Appendix D – Useful Linux Commands and Command Strings ........................................................ 165
Appendix E - How To Access Wireless Devices using SNMP............................................................ 167
Appendix – F: Online Resources ....................................................................................................... 169
PublicIP System Overview
What is the PublicIP System?
That is a very good question!
The PublicIP System is a collection of computer applications (programs) that work together to
allow the implementation of what is referred to as “WiFi” Hotspots or Wireless Access Points. This
system allows you the ability to control several aspects of how the user connects to the WiFi
Hotspot and what resources they are allowed to use. Some people will say, “There should be no
limits imposed”. True – in a perfect world everyone would “share” the resources and the costs but
it is not a perfect world. You still need to “control” how network resources are utilized by people
in order to implement flexible usage scenarios and perhaps more importantly, to protect your own
network in the process!
Part of the system, the ZoneCD PublicIP system, is based on the Morphix LiveCD software (a
derivative of Debian Linux).
The first half of the system, running the Morphix LiveCD system, is done from a CD-ROM and
does not require a Hard Drive for the software to run. The whole Linux operating system “lives”
on the CD (hence the name: LiveCD) and loads applications into the computer’s RAM memory for
execution. All log files are saved in the computer’s RAM memory as well. This “Gateway” server
resides at the hotspot or “Zone” location physically and controls who can access the system and
what access they are allowed. This computer does not require a great deal of computing power
and as such a 200-MHz Intel based computer with 128-Megs of memory, a CD-ROM, 3.5 inch
floppy drive (or USB drive), and two Ethernet cards are all that is required to construct a Zone
Gateway server. Of course you will need at least one wireless Access Point (sometimes called
an “AP” for short) or Wireless AP/Router to complete the hotspot! The LiveCD portion is based
on the GNU license and as such all the source code is on the LiveCD for examination and
modification. There is even a facility built into the Public IP system that allows you to create and
execute your own configuration scripts that can run from the floppy drive/USB drive – this ability
allows you to “customize” the ZoneCD Gateway Server for such things as SSH access, firewall
rules customization, automatic script execution based on time of day (cron) and other highly
useful features that will be covered later in this documentation. The ISO (file ends with .iso)
image of the CD is freely available from the PublicIP website (http://www.publicip.net). All you
have to do is download the ISO image file and burn it the image onto a CD-R Disk. If you do not
have the resources to produce the CD or don’t have a fast Internet connection by which to
download the CD ISO (*.iso) image file you can order one from the same website for a very
reasonable price! Basically you get it for the cost to burn the CD, the price of the CD-R Disk
itself, packaging and postage.
The second half of the system, The Zone Control Server, is based on Fedora Linux running
several applications (MySQL database, Java, Apache with Mod-SSL, PHP, Tomcat, Axis and
some Perl thrown in for good measure).
The Zone Control Server handles all the configuration details for each ”Zone” you have
defined for when you are running the ZoneCD Gateway server in “closed” mode. The Zone
Control Server is located off-site currently in a data-center located in Virginia. If you are curious
about the hosting you can check out the Vendor’s website: http://www.eapps.com/. The Zone
Control Server is NOT based on a GNU license and as such is NOT freely available. There is
ongoing work to produce a Zone Control Server Lite version, which will have a nominal charge for
obtaining it and is meant to provide complete flexibility in running your own system. The details
have not been worked out as of the date of this document but you can find more details as they
become available on the PublicIP website and forums.
As of the writing of this documentation there is no charge for using the current Zone Control
Server to setup and control you’re Zones. You can create Master Accounts on the server to
control multiple Zones, Generate usage reports, download Excel™ (*.xls), or Word™ (*.doc)
formatted files containing the system usage data, setup the PublicIP ZoneCD Gateway Server
configurations, setup the user’s bandwidth limitations and a great deal more.
Why Use the Public IP System?
Granted, you could take a Wireless Access Point or Wireless Router and connect it directly to
an Internet connection source and create a Wireless Hotspot – but you would be exposing your
local network to possible compromise by unauthorized individuals and allowing full access to your
Internet connection to anyone with a wireless card. Here is a list of reasons you would not want
to directly connect a wireless router or access point directly to your local network:
1. Most inexpensive wireless routers do not block access to the WAN side (your local
network side) of their interface. If you connect one in this manner to your local network
someone on the wireless side can “see” and communicate with your internal local
network – Not a Good Thing ™.
2. Most inexpensive wireless access points are nothing more than network “bridges” and do
not have any method to “block” unauthorized access to your internal local network!
3. Most inexpensive wireless access points and routers do not have any form of bandwidth
limiting per user or class – some of them do have a form of bandwidth limiting but it is
limited to the total bandwidth used by all users, not individual classes of users. You want
to make sure you save some bandwidth for yourself and other privileged users!
4. None of the inexpensive (and even most expensive) wireless routers have any form of
web content filtering built-in.
5. Almost no Wireless Routers or Access Points have any form of accounting which keeps
track of who uses the system and provides data that breaks down how the network
resources are being used.
6. Most of the inexpensive wireless routers and access points can “control” access by
means of allowing only wireless clients with valid MAC addresses to connect to the
wireless network – usually this is limited to around 50 or less total clients and even
worse, has to be entered manually into each wireless router or access point to enable the
client to connect.
7. None of the wireless routers or access points have the capability to share client
information, thus allowing clients to connect at different physical locations containing
PublicIP hotspots while still using the same login ID.
Enter the PublicIP System!
Yes – there are other systems out there that can do some of the things the PublicIP system can
do and maybe even a few other things besides, but none of them can beat both the PublicIP
PRICE and FUNCTIONALITY!!! (PublicIP is Free to download and use)
There are all sorts of “wireless control” systems out there that claim they are the solution to any
and every possible WiFi configuration – talk about marketing hype!
As you read through this document you will see how easy it really is to use the PublicIP System.
There is nothing magical about the system and it most likely will do everything you need and
probably more than you had even thought of!
How does it work?
Pretty darn well!
The part of the PublicIP system that runs on your local pc works by adding a piece of
hardware between your AP (wireless access point or wireless router) and your network or Internet
connection. The piece of hardware used for the ZoneCD can be any PC with a minimum of
128MB RAM, two Ethernet cards, a floppy/USB drive, and a CD-ROM (see system
requirements).
NOTE: There is a version that will work from a Compact Flash card and EIDE adaptor but it is “sensitive”
to the BIOS used in the computer you select. This version is still in Beta testing as of the writing of this
document.
During the initial setup you select whether you want to run the Zone in Open or Closed mode.
If you choose to run the Zone in open mode then anyone using the PublicIP wireless hotspot
will be shown a “splash page” that you select (either the default page or one you create using any
of the web page editing software available) and then allowed access to the Internet. This is a
good method to use if you are not concerned about keeping track of the number of users per day
or requiring the user to login to use the hotspot. In the Open Mode the remotely located Zone
Control server is not used.
If you choose to run the Zone in closed mode you will bring the full power of the Zone Control
server into play. In a simple procedure, you will be asked for the Zone login name and password
from your PublicIP registration setup. The ZoneCD Gateway Server (Local) will query the Zone
Control Server (Remote) for its configuration information that you had previously setup on the
Zone Control server, apply any locally stored customizations, and then begin operation. Once the
ZoneCD Gateway server has booted up and gone through this process ZoneCD Gateway Server
(Local) users may login to use the resources you have allocated (bandwidth, allowed IP ports and
such). The Zone Control Server (Remote) keeps track of the time the user is on the system, the
total uplink and downlink bandwidth used and the MAC Address of the device the user used to
connect to the wireless hotspot.
The above description is very brief but gives you a basic understanding of the method of
operation of the Public IP System! We will be covering the operation of the PublicIP system in
much greater detail in the following sections of this documentation. The above description helps
to understand the PublicIP System as a whole, as we cover its different parts in greater detail
later on.
Once the initial setup and configuration is complete for the ZoneCD Gateway computer, the
system can be run headless. Headless meaning there is no need for keeping a keyboard, mouse,
or monitor hooked-up as long as the computer you are using has settings in the BIOS to ignore
any mouse or keyboard missing errors. If your computer does not have a method to ignore a “nokeyboard” error you at least will need to use either a keyboard or a keyboard emulator device to
simulate an attached keyboard (such as a KVM switch). You really don’t want the system to
reboot due to a power outage and have the computer “hang” at the infamous “No Keyboard
Detected – Press F1 to continue” error message!!! You will still need a video card in the
computer as most all of the PC BIOS’s in use today still look for the video adaptor. The CD will
boot completely unattended after the initial setup is complete.
NOTE: It’s not a bad idea to “simulate” a power failure and see what happens when the power is
“restored”. In other words, unplug your ZoneCD Gateway machine while it’s running and then
plug it back in a few seconds later. Does the system come back up the way you want it to? How
does it act when the keyboard and mouse aren’t attached?
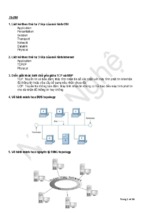
Suggested Network Configuration
It’s not enough to just build the ZoneCD Gateway server, load the CD-ROM and then think you
are done with the learning process – you need to understand “how” to use the system and how to
configure the hardware so the system performs the way you intended. The following diagram
shows one method of installing a wireless hotspot into an existing network. Study the
configuration and note the different network segments in use – notice how the local network (the
192.168.x.x network) is “isolated” from the 10.10.10.x network used by the wireless clients.
The above suggested network configuration shows the ZoneCD Gateway server connected to
your local area network or “LAN” (the router at the top of the picture on the 192.168.x.x network).
This example configuration would be for a setup where a network currently exists and you wanted
to add a ZoneCD Gateway Server to allow wireless access to the Internet (or you could even
allow access to your local network if that is your objective). The firewall represented between the
ZoneCD Gateway server and the local router is really part of the ZoneCD Gateway server and as
such you do not need an extra firewall between them. This suggested network configuration for
the ZoneCD Gateway server is one method you can use as long as the ZoneCD Gateway server
is located between your Internet access and the wireless Access Points (AP) or wireless router
you are good to go!
If you do not have or need a local internal network (the 192.168.x.x in the example above) you
can just connect the ZoneCD gateway computer directly to your Internet Cable or DSL router and
have the ZoneCD talk directly to the Internet. Given the low cost and extended functionality of
Cable or DSL modem/routers available today, it can be more cost/resource effective to put such a
device between the Cable modem or DSL modem instead of loading down the ZoneCD
computer, especially if you are using older hardware to implement the Gateway. Using a
dedicated Cable/DSL enabled Router also gives you more flexibility if you do decide to later setup
a local network or provide other network resources.
NOTE: There have been some reported “issues” in connecting the ZoneCD Gateway computer
directly to a DSL Modem interface so if you are having trouble, it is highly recommended a router
of some sort sit between the ZoneCD Gateway computer and the DSL modem interface
Complex ZoneCD Implementation
Complex Configuration
Internal LAN Area
Public Access Area
PDA
Client
WAD-2
WAD-3
WAD-1
WAN
Internet
PDA
LAN
DSL/
Cable Modem
ZoneCD
Gateway
Server
Switch
or Hub
S
D
W nk
Li
Client
WAD-4
Client
PDA
Workstation Workstation
Client
PDA
Client
The above configuration shows what can be done with a little effort and forethought!
WAD-1 is a Wireless Router that has a WAN Ethernet port connection connected to the
DSL/Cable modem. You could use a Wireless router that has the capability to connect directly to
a DSL or Cable connection but you may find it is less expensive to have your ISP provider
provide the DSL or Cable modem. WAD-1 should have a firewall built in.
WAD-1 is configured to run WPA access using MAC address filtering to allow ONLY the local
trusted computers to connect to it wirelessly. This method allows wireless connections to be
used in a business environment without too much possible exposure to compromise and allows
flexible placement of computer hardware within a business setting
The LAN side of WAD-1 is used for the connection to the “wired” side (eth0) of the ZoneCD
Gateway Server. You could also add more wired local workstations on the LAN side of WAD-1
either by direct connection or using an Ethernet switch or hub.
WAD-2 LAN side is setup to use IP 10.10.10.2, Netmask of 255.255.255.0, gateway IP
10.10.10.1 and DNS IP 10.10.10.1. It connects to the ZoneCD Gateway Server through a switch
or hub on the LAN Ethernet side. DHCP is disabled!
WAD-3 LAN side is setup to use IP 10.10.10.2, Netmask of 255.255.255.0, gateway IP
10.10.10.1 and DNS IP 10.10.10.1. It also connects to the ZoneCD Gateway Server through the
same switch or hub on the LAN Ethernet side. DHCP is disabled!.
WAD-4 is setup a little differently from WAD-2 and WAD-3 to allow WDS link operation. This
configuration comes in handy when you have to place a wireless access point or router in a
location where it is difficult or impossible to run an Ethernet cable. WAD-4 is setup to use IP
10.10.10.4, Netmask 255.255.255.0, gateway IP 10.10.10.1 and DNS IP 10.10.10.1. What
makes this configuration different is you would setup WAD-3 and WAD-4 to perform WDS
(Wireless Distribution System) links between the two wireless devices. DHCP is disabled!
Control Your Users!
This is the reason your here right? If you didn't want control, then you could just setup a Wireless
Access Point (WAP or AP) and be done with it. But if it’s control you want, its control the PublicIP
system will give you. Zone Control enables you to have complete control over the "who", the
"what", and the "when" (the "where" is up to you).
“Who”
You have total visibility and control over who is using your hotspot at all times. The PublicIP
system provides an online, web-based “Zone Control” system that allows you to manage your
Zone(s) from any standards compliant web browser that has access to the Internet. You can
choose from two basic types of registration: web or not web based.
Web based registration can be fast, easy and automatic. An end user that has associated with
your systems wireless AP(s) is automatically presented with a Login/Register page whenever
they open a web browser. The user clicks a registration link on the login page presented,
registers with your Zone, and gets instant access. This is the standard method provided by the
PublicIP system for using web-based access. The web-based registration system can also be
configured to send an email to the user for validation that they indeed did register to use the
zone. This method requires the user to use an actual email address or the user’s account will go
inactive after 24 hours and they will not have access to the zone.
If you don't want to use the instant access method default web pages or need to gather
additional information about the user you can use your own custom registration form hosted on
your web server to register and approve users before they are entered into the system and
allowed access to your zone.
You can also choose not to allow web registration. Instead of a registration form the user will be
presented a custom message that you have set up instructing the visitor how to get access to
your zone (Ex. “See the front desk for a login"). There is a separate registration form in the online
Zone Control Server that you will use to register users for access to the Zone.
Zone Control will also display all user activity. You can use the active session page to view all the
users that are currently using your zone, or you can run reports and even download them as
Excel™ (*.xls), or Word™ (*.doc) files. Active sessions and reports display the MAC address,
username, IP address assigned, session start time, session length, and kilobytes up/down.
“What”
You Control what network resources your users have access to while using your Zone. By taking
advantage of the user class system, you can define how groups of users can access the Internet,
and what they can access. Firewall rules and content filtering play a major role in protecting your
network and users.
Classes are concepts that NoCat had developed into their system to provide higher levels of
access for trusted users. Public IP has taken the class concept to another level by adding the
ability to funnel the classes through a content filter based on the excellent Open-Source Dan’s
Guardian software. The content filter can be applied to the Protected and/or Liberated Class, or
disabled completely.
Firewall rules are also completely customizable for the Protected and Liberated Classes. Trusted
and Super users have very little that needs configuring since they have open access to the
network. ***These classes should be used with caution***.
NOTE: The Trusted and Super classes should be used with caution and understanding. Content filtering is NOT
available for either of these classes and ALL network ports are open. One difference between the Trusted Class and the
Super Class is the firewall rule that can be enabled in the Zone Control for protecting your Local Area Network DO
APPLY to the Trusted User and DO NOT apply to Super users.
When a new user registers at your Zone, the default action is to add the new user to the
Protected Class, but this can also be modified in the Zone Control to be either the Liberated, or
Trusted Class.
Default settings for the different user Classes are:
Protected: ALLOWS traffic on network ports 80, 443, and 110. Content filter is enabled.
Liberated: BLOCKS traffic on 21 25 445 1214 3689 6667 6699. Allows traffic on all other
ports. Content filter is disabled.
Trusted: Firewall disabled. Content filter disabled.
Super: Given network priority, pre-empts traffic from other classes. Firewall disabled.
Content filter disabled.
“When”
Zone Control allows you to enforce limits on when users are able to access your zone. You can
set your zone's "Open" and "Closed" times to only allow access between certain hours. The open
and closed time periods are based on your local time-zone. When a user attempts to make a
wireless connection to your network during “Closed” hours they will be redirected to a page that
displays your logo and says "Sorry we're closed".
At the time of this document’s writing the Zone Control system only allows setting the open and
closed time for a zone based on the “Time of Day” concept. There is work currently being done
to add more granularity to allow configuration on a “Time of Day - Day of Week” and possibly
multiple open/closed time slots per day.
You can also define when the user can access your zone by setting “time limits” for user classes.
A user's time limit can also be adjusted individually. Zone Control allows you to limit a user’s total
hourly usage during a 24 hour period by hourly increments from 1 hour up to unlimited access (24
hours per day). The Open/Closed Zone Time Settings take precedence over the user’s time
limits so even if a user has unlimited access based on time they still would not have access if the
zone was “Closed”.
“Where”
Where is a decision that is up to you. The ZoneCD Gateway server is located at the site location
where you are setting up a Zone. Of course you will need access to the Internet at the location
where you setup the ZoneCD Gateway Server if you are providing Internet access for the zone.
Zone Control Features
Public IP's Zone Control provides an easy way to configure and manage your hotspots, or
"Zones" as they are referred to here.
Most of the configuration is done using two wizards developed to ease the setup procedure. Once
you have setup a Zone Master Account (discussed below), you will have access to a Master
Wizard configuration tool. This is a concept that was developed to aid in the implementation of
multiple Zones. Running the Master Wizard will create a master "blueprint" (master template) for
you to build your new Zones. Running the Zone Wizard will create an instance of a Zone outlined
in your master template. Everything that is set in the master template by the Master Wizard can
be changed for each Zone instance that you create.
Again for clarity’s sake, once you have a Zone you can modify the settings and configurations for
that Zone separately from the settings created for the default master template. This allows you to
have exact customizations for each Zone.
Here is a list of items you can control for each Zone.
Customize your ZoneCD Gateway Server login pages
Choose to use a branded template
Create multiple zones from same login
Zones can be Public, Shared or Private
Separate permissions for your Zone logins.
Configure web registration
User authentication and management
Homepage redirection
Daily time limits per user
Daily download limits
Zone open and close times
Block by MAC address
Configure user permissions (Classes)
Customize firewall rules for each Class
Content Filtering (block pornography, downloads, etc.)
Daily Log Mailer program to receive reports on your Zone’s activities
Block traffic to your *wired* network (LAN)
Branded "Terms of Use" template or you can use your own
Detailed Zone Usage statistics
Multilingual login pages
End-User reporting
Public IP has a professional splash page template that can be branded with your logo. The splash
pages are currently available in Dutch, French, German, Spanish, and of course English.
The above screen is the Default login page the user will see when they connect to your zone and
open a browser to surf the web.
Zone Master Account
In order to use the web-based Zone Control to configure the ZoneCD Gateway Server, you must
register with Public IP to create a Master login on the Zone Control Server. From within your
master login you will setup your Zones each with a separate Zone login. The Zone login you
create will be used during the boot of the ZoneCD Gateway Server to authenticate your Zone to
the Zone Control Server and identify the particular configuration used by the Zone.
The “Zone Login” is different from the “Master Account Login” even though you use them in the
same place when logging into the Zone Control Server. The “Zone Login” is used to log directly
into Zone Control Server for that specific Zone. When used to login to Zone Control Server, the
“Zone Login” will not allow the Zone Operator to change the configuration of the Zone. Zone
logins only have access to user permissions, registration, and reporting. Only Master Account
Logins are able to alter the characteristics of the Zone. This is done to allow zone operators to
give the location staff limited access to Zone Control.
NOTE: A common mistake by new users is to confuse the “Zone Login” id with the “Master Account Login”
id. Your “Master Account Login” id uses the email address that you used when you registered your
Zone Master Account. A “Zone Login” does not have an email address as the username.
When you login to your Master account you will complete a wizard that will help you configure
and customize your zone. This wizard, the “Master Wizard”, will create a template or "blueprint"
for you to use when creating zones. The use of a Master template will save you the trouble of recreating all of the configuration options each time you add a new Zone (If you only have one Zone
to setup, this will not increase the time it takes to get setup). The wizard saves your answers, and
configurations, in the remotely located “PublicIP Control Server” database so the Zone Wizard will
have these values when generating a new zone for you.
The “Master Account” login is the heart of the system and is where the zone information resides
for each zone you setup. The overall concept is as follows:
•
The Master Account contains the information for each of your Zones which can be unique
for each Zone and each of the Zones control what an end user person can do when they
log into the Zone location or hotspot if you prefer.
•
The ZoneCD Gateway Server downloads the unique configuration for its Zone from the
remotely located PublicIP Control Server, which is based on the information for the zone
as it is defined in the Zone Master Account.
•
To preclude someone attempting to “mimic” a ZoneCD Gateway server for nefarious
reasons, all of the communications between the ZoneCD gateway server and the
PublicIP Control Server is encrypted using 128-bit SSL encryption.
The overall concept of Master Account login types and Zone Account login types will become
more apparent as you go through this document. It is a very good concept but does take a little
reading and thinking to get the maximum benefit from the system!
Creating a Zone Control Master Account
The Public IP Control Server Login screen:
The above screen is displayed when you access the Zone Control Server by using the link on the PublicIP
Website. If you access the Zone Control Server directly the screen is different but performs the exact same
functionality.
There are three functions served by this innocent looking login screen.
1.
Creation of a new Master Account
Creation of the master account is the first step you need to perform to use the Zone Control Server.
2.
Login to an existing Master Account
Access to the Zone Control Server for your zones is performed by using the email address you
specified when you created the master account on the Zone Control Server.
3.
Login to an existing Zone Account
Logging into a zone within your master account is performed by using the username and password
you specified for the ZoneCD Gateway server to use to log into the Zone Control Server.
When you have completed reading this document you will know how to perform all three types of logins
listed above.
Don’t be intimidated by this system – it really is very simple once you have understood the underlying
concepts this system is based on. You will find it to be very flexible and as the old saying goes “With
Flexibility Comes Perceived Complexity” or “Any Technology Sufficiently Advanced Enough Will Always
Appear to be *Magic*”…
The Public IP Control Server Login screen (Alternate Access):
The above screen is the screen you see when access the PublicIP Zone Control Server directly
by its URL: http://ssl.publicip.net or if you open the web browser on the ZoneCD Gateway
Server in the GUI Mode. The web browser in the ZoneCD Gateway Server has the Zone Control
Server URL setup as the default web site to access.
The functionality is exactly the same as with the Zone Control Server access method from the
PublicIP website.
There are three functions served by this innocent looking login screen.
1.
Creation of a new Master Account
Creation of the master account is the first step you need to perform to use the Zone Control Server.
2.
Login to an existing Master Account
Access to the Zone Control Server for your zones is performed by using the email address you
specified when you created the master account on the Zone Control Server.
3.
Login to an existing Zone Account
Logging into a zone within your master account is performed by using the username and password
you specified for the ZoneCD Gateway server to use to log into the Zone Control Server.
Creating a New Master Login Account:
To create a new Master Login Account click on the New Master Account under the login button. You will
be presented with a web page that looks like the following.
Enter the information on the form presented:
Email:
Pass:
Pass Again:
The email address you are using for this Master Login Account.
The password for access to this Master Account.
Enter the password again for verification.
The reason you use an email address for the Master Account login is the Zone Control system
differentiates between a Master Account login and a Zone Account login by the fact the Master
Account logs in with an email address and the Zone Account logs in with just a login name. (that
is not an email address). This will become clear later in the document. The email address is also
used for validation of the Master Account by way of an email you use to link back to the Zone
Control Server to verify the Master Account is really being created by you.
Once you have all the information filled in press the “Create Master Login” button.
Create Master Account – Step 2
Once you have completed the “Create Your Login:” form and clicked the “Create Master Login”
button you are presented with an information screen. The information tells you to follow the
instructions contained in an email that will be sent to the email address you specified as the
Master Account Username Email address.
The next thing you need to do - is follow the instructions supplied in the email sent to the email
address! The information supplied in the email will look something like this:
“Click the link, then login to activate your Zone Control *Master* account.
https://ssl.publicip.net/manage/?action=validate&hash=xxxxxxxxxxxxxxxxxxxxxxxxxxxxxxx”
Click on the link supplied in the email or if your email client does not support this, copy and paste
the URL link in a web browser ( you need the WHOLE URL link – including the “validate& hash=”
values the hash value contains information about your master account so you want to make sure
you get ALL of the hash value!)
Create Master Account – Step 3
Once you click on the email activation link or cut and paste the activation link into a browser you
will be presented with the web page shown here. Note the “Login with your registered email
and password to complete the activation” message on the page. This message does not
appear anywhere else and is only displayed during the initial Master Account activation.
Enter the email address you used when you created the Master Account on the Zone Control Server in the
Username space on the form.
Enter the Password you specified when you created the Master Account on the Zone Control Server in the
Password space on the form.
Click the Login button to log into the Master Account you created on the Zone Control Server.
- Xem thêm -