Mô tả:
26/09/2012
Package Evaluation
T i i
Training
Package Checking scheme
PE-09/2012-04-01
Agenda
1.
2
2.
Package checked overview
Package sampling and check - OM
TBA/19
A3 Flex
A3 Complex Flex
A3 Speed
….
Trainer to provide hard copy of
• “Package check” chapter for each type of filling machine from OM
to trainees
• TEM -1531354-0102 TBA/8, TBA/19, TBA/9 Laboratory Package
Checks
PE-09/2012-04-01
/2
1
26/09/2012
Package check
overview
i
Checking scheme
PE-09/2012-04-01
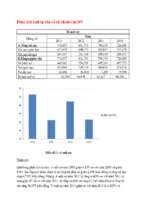
Package Checks – Overview
Date Print
Laboratory check
Shape and Design
Crease lines
XX
Conductivity test
and Dye test
Overlap
Surfaces
Flap sealing
Production
LS/SA tear down
Weight
Laboratory check
XX
TS Dissolving
XX
TS rough
Production
TS: Tear down
Note:
Laboratory check
*
LS: Ink injection*
xx = number of samples, at least equal to
number of jaw
* For A3/CF required 2 packages for normal
production and 10 packages after adjusting.
PE-09/2012-04-01 / 4
2
26/09/2012
TBA/19 – Package
sampling
li and
d check
h k
Checking scheme
PE-09/2012-04-01
Package Checks
Production – OM
For p
package
g checks at PRODUCTION start or at the
splicing of a new reel of packaging material, take 3
packages from the conveyor.
► Use the same two package to perform all the checks that
require two packages, the third package is used specifically
for the LS/SA check, patch or a tab strip splice.
► For package checks at the splicing of a new LS strip, patch
or tab strip reel, take 1 package from the conveyor.
►
PE-09/2012-04-01
/6
3
26/09/2012
Package Identification
Production - OM
When selecting
gp
packages,
g
always
y select p
packages
g in p
pairs.
When the jaw system is running, visually identify a package
made in one of the jaws. Press the DROP CHUTE IN
POSITION OFF button to eject one package, and not which
jaw made it. The first package which leaves the outfeed
conveyor after the gap was made in the other jaw.
► Mark RH on the package made in the right jaw. Mark LH on
the package made in the left jaw.
►
►
PE-09/2012-04-01
/7
Checking Scheme Table
The Checking Scheme Table explains:
• the events which it is recommended that the
package checks are performed immediately
after, e.g. Production Start (1)
• the number of packages needed according
to which event has prompted the package
checks (2)
• the number of packages on which to
perform the individual checks (3)
• the check to be performed (4)
• the page number of the check instructions
(5)
• to mark the check box when the check has
been completed (6).
PE-09/2012-04-01
/8
4
26/09/2012
PE-09/2012-04-01
/9
Flowchart of the Production
Quality Checks
The Flowchart of Production Quality
Checks displays:
p y
the checks to be performed in the
sequence described in the checking
scheme table (1)
the type of check (2)
the necessary actions (if any) to
be taken depending on the result
of the completed check (3).
PE-09/2012-04-01 / 10
5
26/09/2012
PE-09/2012-04-01 / 11
Laboratory Check
► To
perform the laboratory checks at least three
packages
k
are needed.
d d Two
T
extra
t packages
k
might
i ht
be needed if conductivity and dissolving tests are
to be performed in parallel.
► Checking scheme, see next slide
PE-09/2012-04-01 / 12
6
26/09/2012
PE-09/2012-04-01 / 13
A3 Flex – Package
sampling
li and
d check
h k
Checking scheme
PE-09/2012-04-01
7
26/09/2012
Package Checks
Production – OM
For p
package
g checks at PRODUCTION start or at the
splicing of a new reel of packaging material, take 3
packages from the conveyor.
► Use the same two package to perform all the checks that
require two packages, the third package is used specifically
for the LS/SA check, patch or a tab strip splice.
► For package checks at the splicing of a new LS strip, patch
or tab strip reel, take 1 package from the conveyor.
►
PE-09/2012-04-01 / 15
Package Identification
Sample packages
►
To select packages and to be able to identify from which jaw
pair the package were formed
formed, proceed as follow :
1. Touch the PRODUCTION CONTROL button
2. Touch the PACKAGE FORMING UNIT
button
3. Touch the SAMPLE PACKAGE icon
4. Select the RH side or LH side which the first package
sample should be taken
5. Touch “ON” button to start the sampling of the
package
PE-09/2012-04-01 / 16
8
26/09/2012
Package Identification
Sample packages
6. The jaw system discards a package.
Take the necessary package samples from the
conveyor after the gap created by the discarded
package.
Note! Touching the LH side will cause the jaw system to eject a
package from the RH side jaw leaving a gap in the package
outfeed to identify the LH side package.
PE-09/2012-04-01 / 17
Package Identification
If 3 package samples have been collected from
the conveyor, use an indelible pen to mark on
the top and bottom of each of the package
samples as follows:
• mark the package made in the RH jaw with
the number 1 and the letters RH.
• mark the package made in the LH jaw
with the number 2 and the letters LH .
• mark the third package with the number
3 and the letters LS.
If 1 package sample has been collected from
the conveyor, use an indelible pen to mark on
the top and bottom of the package sample
with the letters LS.
PE-09/2012-04-01 / 18
9
26/09/2012
Checking Scheme Table
The Checking Scheme Table explains:
• the events which it is recommended that the
package checks are performed immediately
after, e.g. Production Start (1)
• the number of packages needed according
to which event has prompted the package
checks (2)
• the number of packages on which to
perform the individual checks (3)
• the check to be performed (4)
• the page number of the check instructions
(5)
• to mark the check box when the check has
been completed (6).
PE-09/2012-04-01 / 19
PE-09/2012-04-01 / 20
10
26/09/2012
Flowchart of the Production
Quality Checks
The Flowchart of Production Quality
Checks displays:
p y
the checks to be performed in the sequence
described in the checking scheme table (1)
the type of check (2)
the necessary actions (if any) to be taken
depending on the result of the completed
check (3).
PE-09/2012-04-01 / 21
PE-09/2012-04-01 / 22
11
26/09/2012
Laboratory Check
► To
perform the laboratory checks at least three
packages
k
are needed.
d d Two
T
extra
t packages
k
might
i ht
be needed if conductivity and dissolving tests are
to be performed in parallel.
► Checking flowchart, see next slide
PE-09/2012-04-01 / 23
PE-09/2012-04-01 / 24
12
26/09/2012
A3 CompactFlex Package sampling and
check
Checking scheme
PE-09/2012-04-01
Package Checks
Production - OM
For p
package
g checks at PRODUCTION start or at the
splicing of a new reel of packaging material, take 3
packages from the conveyor.
► Use the same two package to perform all the checks that
require two packages, the third package is used specifically
for the LS/SA check, patch or a tab strip splice.
► For package checks at the splicing of a new LS strip, patch
or tab strip reel, take 1 package from the conveyor.
►
PE-09/2012-04-01 / 26
13
26/09/2012
Package Identification
Sample packages
►
To select packages and to be able to identify from which jaw
pair the package were formed
formed, proceed as follow :
1. Touch the PRODUCTION CONTROL button
2. Touch the PACKAGE FORMING UNIT button
3. Touch the SAMPLE PACKAGE icon
4. Select the RH side or LH side which the first package
sample should be taken
5. Touch “ON” button to start the sampling of the package
PE-09/2012-04-01 / 27
Package Identification
Sample packages
6. The jaw system discards a package.
Take the necessary package samples from the
conveyor after the gap created by the discarded
package.
Note! Touching the LH side will cause the jaw system to eject a
package from the RH side jaw leaving a gap in the package
outfeed to identify the LH side package.
PE-09/2012-04-01 / 28
14
26/09/2012
Package Identification
If 3 package samples have been collected from
the conveyor, use an indelible pen to mark on
the top and bottom of each of the package
samples as follows:
• mark the package made in the RH jaw with
the number 1 and the letters RH.
• mark the package made in the LH jaw
with the number 2 and the letters LH .
• mark the third package with the number
3 and the letters LS.
If 1 package sample has been collected from
the conveyor, use an indelible pen to mark on
the top and bottom of the package sample
with the letters LS.
PE-09/2012-04-01 / 29
Checking Scheme
The Checking Scheme Table explains:
• the events which it is recommended that the
package checks are performed immediately
after, e.g. Production Start (1)
• the number of packages needed according
to which event has prompted the package
checks (2)
• the number of packages on which to
perform the individual checks (3)
• the check to be performed (4)
• the page number of the check instructions
(5)
• to mark the check box when the check has
been completed (6).
PE-09/2012-04-01 / 30
15
26/09/2012
* Intended for every packaging
material reel
** To be performed at least one
per day (maximum interval of 24
hours) or according to dairy
internal quality procedures,
ideally one per shift. For the
packages integrity checks 2
packages our needed. If the LS
by Red ink injection check will
also be performed an additional
2 packages are necessary if the
machine settings are stable or
10 packages if the machine
settings have been recently
changed.
PE-09/2012-04-01 / 31
Flowchart of the Production
Quality Checks
The Flowchart of Production Quality
Checks displays:
p y
the checks to be performed in the
sequence described in the checking
scheme table (1)
the type of check (2)
the necessary actions (if any) to
be taken depending on the result
of the completed check (3).
PE-09/2012-04-01 / 32
16
26/09/2012
PE-09/2012-04-01 / 33
Laboratory Check
► To
perform the laboratory checks at least three
packages
k
are needed.
d d Two
T
extra
t packages
k
might
i ht
be needed if conductivity and dissolving tests are
to be performed in parallel.
► Checking flowchart, see next slide
PE-09/2012-04-01 / 34
17
26/09/2012
PE-09/2012-04-01 / 35
A3 Speed - Package
sampling
li and
d check
h k
Checking scheme
PE-09/2012-04-01
18
26/09/2012
Package Checks
Production - OM
Production Start has to be repeated every 30,000 packages
produced
d
d (i
(i.e. every 3000 TS made
d b
by each
h iinductor),
d t ) ttake
k
12 packages.
► Use the ten package to perform all the checks that require
ten packages, one package used for LS/SA check, and
another one package for forming and surface.
► Splicing check event is intended for every splice of
Packaging Material and strip.
► Additional
Additi
l packages
k
to
t laboratory
l b t
QC tto b
be performed
f
d att
least once per day (maximum interval of 24 hours).
►
PE-09/2012-04-01 / 37
Package Identification
Sample packages
►
To select packages and to be able to identify from which jaw
pair the package were formed
formed, proceed as follow :
1.Touch the PRODUCTION CONTROL button
2.Touch the PACKAGE FORMING UNIT button
3. Touch the arrows button to select if sampling one
single package or a batch of packages.
One single package
A batch of package
Note : A batch is composed by 10 packages, one for each pair of jaw links
PE-09/2012-04-01 / 38
19
26/09/2012
Package Identification
Sample packages
4a. Touch the PACKAGE SAMPLE NUMBER icon to select from
4a
which pair of the jaw links has to exit the single package to sample
(Setting available only for the sampling of one single package )
4b. Use the ARROW buttons or the KEYBOARD button to set
number of the jaw links.
4c. Touch the ON button to start the sampling of the packages.
PE-09/2012-04-01 / 39
Package Identification
Sample packages
• The machine discards a package
from the reference jaw pair (jaw pair
number 10).
• On the conveyor, there is a gap
caused by the discarded package.
Take the first 10 packages after the
gap. The first package after the gap is
from jaw number 1.
• Package Identification Take the first
ten packages and label them at the top
and bottom, from 1 to 10, with an
indelible pen. This correspond with
jaws 1 to 10.
PE-09/2012-04-01 / 40
20
- Xem thêm -