Mô tả:
22/09/2012
Package Evaluation
T i i
Training
Longitudinal Sealing
PE-04/2012-04-01
Agenda
1. Principle of LS and SA sealing
2. Evaluation – Visual inspection + Practical
3. Evaluation – Mechanical tear down + Practical
4. Evaluation – Red ink injection + Practical
5. Sample of the defect
PE-04/2012-04-01 / 2
1
22/09/2012
1. Principle of LS and
SA sealing
li
Longitudinal Sealing
PE-04/2012-04-01
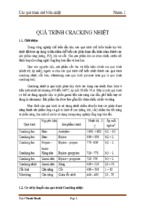
1. Principle of LS and SA sealing
LS Strip Function
The
e Longitudinal
o g ud a Strip
S p in Tetra
e a Brik Aseptic
sep c system
sys e
has 3 main functions:
1)
2)
3)
To prevent product absorption into the packaging material
edge
To improve the gas barrier properties of the longitudinal
seal area
To strengthen the longitudinal seal
PE-04/2012-04-01 / 4
2
22/09/2012
1. Principle of LS and SA sealing
LS Strip application - terminology
The strip
p applicator
pp
side ((SA)) of
the seal is where the strip (2) is
attached to the packaging
material by the strip applicator.
The SA is the side of the strip
where the packaging material (3)
is double.
The Longitudinal sealing side (LS)
is the side if the strip (2) where
the packaging material (1) is
single.
An air gap (4) is present in the
middle of the seal.
PE-04/2012-04-01 / 5
1. Principle of LS and SA sealing
SA Sealing
The Operations are:
1)The
edge of internal surface
of packaging material is
heated to melt the plastic
layer either by hot air, or by
induction heating.
2))The strip
p is laid on the
surface and pressed onto the
packaging material using
pressure rollers.
3) The SA is then made.
PE-04/2012-04-01 / 6
3
22/09/2012
1. Principle of LS and SA sealing
LS Sealing
The LS makes a tight tube of
packaging material just prior to coming
in contact with the filling product.
The flat PM (strip on one edge), is
guided into a tube form.
The edge without strip is heating (hot
air or induction heating) by the
longitudinal element.
The heated edge meets the
underlying
y g unheated one and the two
are pressed together between two
rollers.
This sealing is achieved between the
inner and the outer surfaces of PM
and between the strip and the inside of
the tube.
PE-04/2012-04-01 / 7
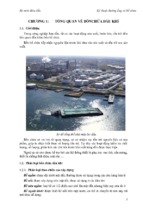
1. Principle of LS and SA sealing
Type of sealing system
Tetra Pak A3/CF
hot air
hot air
PE-04/2012-04-01
/8
4
22/09/2012
1. Principle of LS/SA sealing
LS sealing component – Lower forming ring and LS
spring
PE-04/2012-04-01
/9
1. Principle of LS/SA sealing
LS sealing component – Spring Force
PE-04/2012-04-01 / 10
5
22/09/2012
1. Principle of LS/SA sealing
LS sealing component – Hot air and Induction
Heating
Longitudinal sealing
Hot air
Longitudinal sealing inductor
PE-04/2012-04-01 / 11
1. Principle of LS and SA sealing
LS strip Application
► The
LS Strip application evaluation consists of
three steps:
1)
2)
3))
Visual inspection of LS position and check of heat and
pressure distribution
Sealing quality check, by performing the mechanical
tear down of the LS Strip.
LS Strip
p tightness,
g
by
yp
performing
g the red ink injection
j
test.
PE-04/2012-04-01 / 12
6
22/09/2012
2. Evaluation – Visual
I
Inspection
ti
Longitudinal Sealing
PE-04/2012-04-01
2. Evaluation – Visual inspection
Preparation Sample
1.Unfold the Flaps of package
sample
2. Cut two opposite corners
3. Empty the package content
4. Cut the sample corner to
corner
PE-04/2012-04-01 / 14
7
22/09/2012
2. Evaluation – Visual inspection
Preparation Sample
5. Open up the sample,
rinse it with water and dry it.
PE-04/2012-04-01 / 15
2. Evaluation – Visual Inspection
Why Visual inspection
► By
y
visuallyy examining
g the LS, will g
get quick
indication if there are any malfunctioning sealing
components in the machine.
► Check for scratched, stretch marks, overheated
area and strip position.
► Use Zonoscope to examine heat distribution
g the longitudinal
g
seal.
along
Note! Good light is important when
evaluating the seal quality
PE-04/2012-04-01 / 16
8
22/09/2012
2. Evaluation – Visual inspection
Strip Position
The LS strip is not always
centred with respect to the
seal. For MPM and MSE LS
strip types, 60-70% of the
strip covers the SA side or
~ 4.2 – 4.9 mm.
Guideline
G
id li : The
Th air
i gap (4)
should be simply visible
and not exceeding 1.0 mm.
PE-04/2012-04-01 / 17
2. Evaluation – Visual Inspection
Heat distribution by Zonoscope
X
X
TBA/lk
TBA/jl
PE-04/2012-04-01 / 18
9
22/09/2012
2. Evaluation – Visual inspection
Scratches mark
Defective
Defective
Deep scratches – Compromise package integrity
Check inside surfaces for scratches. Inside deep scratches
might cause package integrity problem.
If there are any defects, corrective actions should be taken.
PE-04/2012-04-01
/ 19
2. Evaluation – Visual Inspection
Overheated, Blistering and Bubbles
Defective – Compromise package tightness
Overheated
Blisters
Bubbles
PE-04/2012-04-01 / 20
10
22/09/2012
2. Evaluation – Visual Inspection
LS strip wrinkle / Fish bone
Defective –
Compromise
package tightness
Wrinkle in strip,
most likely due to
strip position too
much on LS side.
Too high spring
pressure or
temperature.
Pressure Rool???
(con lan chia mep
giay)
PE-04/2012-04-01 / 21
2. Evaluation – Visual Inspection
Overheated
Defective
Overheated
Excessive settings or
uneven pressure (LS
roller may not in
control) result in risk
of affecting the
performance.
PE-04/2012-04-01 / 22
11
22/09/2012
2. Evaluation – Visual Inspection
Blistering/Overheated
Defective
Blistering/Overheated
Check for any blister or
bubble along the heated
zone of strip.
The presence of blisters in
the LS or SA side of the strip
p
indicates too high sealing
setting, either energy or
pressure
PE-04/2012-04-01 / 23
2. Evaluation – Visual Inspection
PE residue
Defective – Blocked
seal
PE residue
LDPE residue are
trapped below the strip
g the sealing
g
affecting
PE-04/2012-04-01 / 24
12
22/09/2012
2. Evaluation – Visual Inspection
Blocked seal
Defective Blocked seal
Strip and inside
PE not seal
PE-04/2012-04-01 / 25
3. Evaluation –
M h i l Tear
Mechanical
T
down
d
Longitudinal Sealing
PE-04/2012-04-01
13
22/09/2012
3. Evaluation – Tear down
Preparation Sample
1.Unfold the flaps of package
sample
2. Cut two opposite corners
3. Empty the package content
4. Cut the sample corner to
corner
PE-04/2012-04-01 / 27
2. Evaluation – Tear down
Preparation Sample
5. Open up the sample, rinse it
with water and dry it.
6. Cut the package sample along the
middle of LS (1) and LS air channel (2)
Cutting line is (3)
PE-04/2012-04-01 / 28
14
22/09/2012
2. Evaluation – Tear down
Tear down evaluation – Check Overlap
Pull off the outer
layer where it is
double, overlap.
Check that the
overlap is
properly sealed
since is giving
strength to the
final package.
Good overlap when the seal
is even and rupture at least
on outside PE layer
Double
layer not
complete
separate
Double layer
must be
complete
separate
PE-04/2012-04-01 / 29
2. Evaluation – Tear down
Tear down evaluation – Bad/uneven seal Overlap
PE-04/2012-04-01 / 30
15
22/09/2012
2. Evaluation – Tear down
Tear down evaluation – Good Overlap
Outer PE layer removed
Outer PE and some
fibred removed
PE-04/2012-04-01 / 31
3. Evaluation – Tear down
GOOD SEAL
Separation
between the two
inner coatings
When the strip is
pulled off and one of
the inner coating
comes off with the
strip (1) leaving a
rupture edge (2)
along the seal.
PE-04/2012-04-01 / 32
16
22/09/2012
3. Evaluation – Tear down
GOOD SEAL
Separation
between the Alfoil and the
inside coatings
When the strip (1) is
pulled off and the two
p
inner coatings come
off leaving the Al- foil
uncovered
PE-04/2012-04-01 / 33
3. Evaluation – Tear down
GOOD SEAL
Rupture in the
paperboard
When the strip is
pulled outwards and
all inner layers
including the Al-foil
come off with the
strip (1), leaving
paperboard fibres
(3)
PE-04/2012-04-01 / 34
17
22/09/2012
3. Evaluation – Tear down
GOO SEAL
GOOD
S
Separation in
the LS strip
When the strip(1)
is pulled off and
one of the strip is
left on the
packaging
material. This can
happen also in the
cross, where LS
and TS meet.
PE-04/2012-04-01 / 35
3. Evaluation – Tear down
Laminate PE
GOOD SEAL
Separation of
laminate PE
When all inner layers
including the Al-foil
come off with the strip
((1)) leaving
gp
part of the
lamination layer (4) on
the paper board.
PE-04/2012-04-01 / 36
18
22/09/2012
3. Evaluation – Tear down
Defective seal
Cold or
blocked seal
When the strip (1) is
pulled off and it
comes off leaving
the inner coatings
unaffected or with a
grayish surface.
PE-04/2012-04-01 / 37
4. Evaluation – Red
I k Injection
Ink
I j ti
Longitudinal Sealing
PE-04/2012-04-01
19
22/09/2012
4. Evaluation – Red Ink Injection
Preparation of the sample
1. Unfold the flaps of
package sample
2. Cut two opposite
corners.
Empty the package
content and cut the
sample corner to
corner.
3. Open the
sample ,rinse it
with water
and dry it
PE-04/2012-04-01 / 39
4. Evaluation – Red Ink Injection
Preparation of the sample
Be careful not to over stress samples during their preparation
PE-04/2012-04-01 / 40
20
- Xem thêm -