NXManufacturingFundamentals _ Workbooks
NX Manufacturing Fundamentals
Workbook
April 2007
MT11021 — NX 5
Publication Number
mt11021_w NX 5
Manual History
Manual
Revision
Unigraphics
Version
Version 16.0
Version 17.0
Version 17.0
Version 18.0
Unigraphics NX
Unigraphics NX 2
NX 3
NX 4
NX 5
Publication
Date
March 1999
January 2001
June 2001
September 2001
September 2002
September 2003
November 2004
January 2006
April 2007
This edition obsoletes all previous editions.
Proprietary & Restricted Rights Notice
This software and related documentation are proprietary to UGS Corp.
© 2007 UGS Corp. All Rights Reserved.
All trademarks belong to their respective holders.
2
NX Manufacturing Fundamentals
mt11021_w NX 5
Contents
The Manufacturing Process . . . . . . . . . . . . . . . . . . . . . . . . . . . . . . . . 1-1
Create a Clamp . . . . . . . . . . . . . . . . . . . . . . . . . . . . . . . . . . . . . . . . . . 2-1
Fixture Assembly . . . . . . . . . . . . . . . . . . . . . . . . . . . . . . . . . . . . . . . . 3-1
Create a Setup Sheet . . . . . . . . . . . . . . . . . . . . . . . . . . . . . . . . . . . . . 4-1
Set the Machining Environment . . . . . . . . . . . . . . . . . . . . . . . . . . . . 5-1
Set the MCS, Part, Blank, Check Geometry and Mill Method . . . . . 6-1
Create a Cavity Milling operation. . . . . . . . . . . . . . . . . . . . . . . . . . . 7-1
Visualize and Verify. . . . . . . . . . . . . . . . . . . . . . . . . . . . . . . . . . . . . . . 8-1
Face Milling . . . . . . . . . . . . . . . . . . . . . . . . . . . . . . . . . . . . . . . . . . . . . 9-1
Drilling. . . . . . . . . . . . . . . . . . . . . . . . . . . . . . . . . . . . . . . . . . . . . . . . 10-1
Post Processing and Shop Documentation. . . . . . . . . . . . . . . . . . . 11-1
©UGS PLM Software, All Rights Reserved
NX Manufacturing Fundamentals
3
1
Lesson
1
The Manufacturing Process
The workbook project consists of various aspects of designing and machining
a part of a manufacturing assembly. The manufacturing assembly is
comprised of the work holding device, blank material, and the piece part, in
this case a bracket. The bracket part is considered to be the Master Model
and the work holding device and blank material are considered component
parts of the assembly.
The manufacturing processes or methods that you will use, in this workbook,
may or may not be the same approach, in order or content, that you would use
at your company. The end result, the final part, is the same. What is more
important, in this class, is gaining an understanding of the methodology and
application of using the various manufacturing options of NX, allowing you
to customize tool path generation to methods or processes that you have
become familiar with.
©UGS PLM Software, All Rights Reserved
NX Manufacturing Fundamentals
1-1
The Manufacturing Process
1
The following flowchart illustrates the Manufacturing process steps that you
will use when creating and processing tool paths in NX.
1-2
NX Manufacturing Fundamentals
©UGS PLM Software, All Rights Reserved
mt11021_w NX 5
Lesson
2
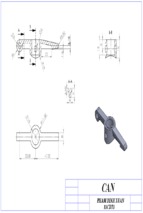
Create a Clamp
2
In this section, you will create a clamp. Later, you will finish the setup
assembly and create a setup sheet. You will then begin the process of
programming the part to completion.
Step 1:
Open the part seedpart_in and save it as ***_clamp_1 where ***
represents your initials.
Step 2:
Create a rectangular shape extrusion as shown below. Enter the
entire expression as the value in the length fields (i.e. BLLG=5.25).
Locate the block at WCS of 0,0,0.
Note
Expression names used will aid you in referencing the values
used later in this project.
BLLG=5.25 BLHT=0.75 BLWD=2.0
©UGS PLM Software, All Rights Reserved
NX Manufacturing Fundamentals
2-1
Create a Clamp
The extrusionis created and is positioned in the location specified.
Note the orientation of the extrusion with respect to the WCS.
Expressions are also stored for the three equations that were
keyed in. These expressions store the parameters used for the
extrusion creation and allow the ability to modify the extrusion, if
so required, with minimal effort.
2
Step 3:
2-2
Change the work layer to 61. Create three datums that pass
through the center of the part, based on width, length and height
as shown.
NX Manufacturing Fundamentals
©UGS PLM Software, All Rights Reserved
mt11021_w NX 5
Create a Clamp
Step 4:
Create a slot 2.0” long by 0.625” wide by 1.0” deep. Position the slot
to center it on the datums as shown.
2
©UGS PLM Software, All Rights Reserved
NX Manufacturing Fundamentals
2-3
Create a Clamp
Step 5:
Create a boss on one end of the clamp. Make the boss .5” diameter
by .5” tall. Center it on the end of the clamp.
2
2-4
NX Manufacturing Fundamentals
©UGS PLM Software, All Rights Reserved
mt11021_w NX 5
Create a Clamp
Step 6:
Create a slot on the under side of the clamp. Create the slot .375”
wide, .1875” deep and centered on the datum plane.
2
©UGS PLM Software, All Rights Reserved
NX Manufacturing Fundamentals
2-5
Create a Clamp
Step 7:
Blend the four outside corners, with .25” radius as shown.
Step 8:
Save and Close the part
2
2-6
NX Manufacturing Fundamentals
©UGS PLM Software, All Rights Reserved
mt11021_w NX 5
Lesson
3
Fixture Assembly
In this section, you will complete the assembly for the machining setup. Most
of the setup has already been completed for you. Your task is to add two
locating pins to accurately position the raw stock.
Step 1:
Open the assembly workbook_mfg and save it as
***_workbook_mfg where *** represents your initials.
The current setup consists of the following:
a tooling plate with multiple mounting holes
(workbook_tooling_plate)
©UGS PLM Software, All Rights Reserved
NX Manufacturing Fundamentals
3-1
3
Fixture Assembly
the designed part which is to be machined
3
the raw stock the part is being manufactured from
3-2
NX Manufacturing Fundamentals
©UGS PLM Software, All Rights Reserved
mt11021_w NX 5
Fixture Assembly
a ’window frame’ designed to hold the part in place while
machining. The frame is the remains of the raw stock,
designed with small holding tabs that attach to the part. After
machining, the tabs are removed.
3
©UGS PLM Software, All Rights Reserved
NX Manufacturing Fundamentals
3-3
Fixture Assembly
a set of clamps, holding the stock in place during the machining
process
3
3-4
NX Manufacturing Fundamentals
©UGS PLM Software, All Rights Reserved
mt11021_w NX 5
Fixture Assembly
Your task is to add two locator pins at the location indicated.
3
Step 2:
Add the workbook_locator_pin to the assembly using the BODY
reference set.
Note
The workbook_locator_pin is owned by another user and
is write-protected. It may not be modified or saved. The
assembly file is owned by you and may be modified and
saved.
Step 3:
Mate the locator pin to the tooling plate by applying the proper
mating conditions between the appropriate faces (A to A and B
to B).
©UGS PLM Software, All Rights Reserved
NX Manufacturing Fundamentals
3-5
Fixture Assembly
3
Tip
Use the mating conditions of Mate (B) and Center (A).
3-6
Step 4:
Add the last locator pin at the other designated location.
Step 5:
Save and Close the part
NX Manufacturing Fundamentals
©UGS PLM Software, All Rights Reserved
mt11021_w NX 5
Lesson
4
Create a Setup Sheet
In this section, you will create a setup sheet showing the location of locator
pins, clamps, stock and the MCS of 0,0,0.
Step 1:
Open the seedpart_in part and save it as ***_workbook_dwg
where *** represents your initials.
Step 2:
Add the ***_workbook_mfg to the assembly using the BODY
reference set.
Step 3:
Save the part.
Step 4:
In the Assembly Navigator, turn off the display of the
workbook_stock file. This will all the designed part to display in
the drawing view.
Step 5:
Enter the Drafting application and specify a drawing sheet where
the units are inches, the scale is 1/8, the drawing size is A and
the drawing name is SETUP1.
©UGS PLM Software, All Rights Reserved
NX Manufacturing Fundamentals
4
4-1
Create a Setup Sheet
Step 6:
Under Preferences, turn off Centerlines.
4
4-2
NX Manufacturing Fundamentals
©UGS PLM Software, All Rights Reserved
mt11021_w NX 5
- Xem thêm -