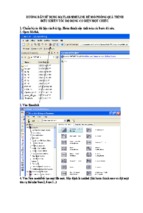
Mô tả:
Sections
INTRODUCTION
EXERCISES
LADDER PROGRAMS
A
B
C
APPENDIX
D
USER’S MANUAL
FX-TRN-BEG-E
FX-TRN-BEG-E
FX-TRN-BEG-E
FX-TRN-BEG-E
USER’S MANUAL
Manual number : JY997D02901
Manual revision : B
Date
: NOVEMBER 2002
i
FX-TRN-BEG-E
ii
FX-TRN-BEG-E
FAX BACK
Mitsubishi has a world wide reputation for its efforts in continually developing and pushing back
the frontiers of industrial automation. What is sometimes overlooked by the user is the care
and attention to detail that is taken with the documentation. However, to continue this process
of improvement, the comments of the Mitsubishi users are always welcomed. This page has
been designed for you, the reader, to fill in your comments and fax them back to us. We look
forward to hearing from you.
Fax numbers:
Your name: ...................................................
Mitsubishi Electric....
.....................................................................
America
(01) 847-478-2253
Your company: .............................................
Australia
(02) 638-7072
.....................................................................
Germany
(0 21 02) 4 86-1 12
Your location:................................................
Spain
(34) 93-589-1579
.....................................................................
United Kingdom
(01707) 278-695
Please tick the box of your choice
What condition did the manual arrive in?
!Good
!Minor damage
Will you be using a folder to store the manual? !Yes
!No
What do you think to the manual presentation?!Tidy
!Unfriendly
Are the explanations understandable?
!Yes
!Not too bad
!Unusable
!Unusable
Which explanation was most difficult to understand: ..................................................................
....................................................................................................................................................
Are there any diagrams which are not clear?
!Yes
!No
If so,which: ..................................................................................................................................
What do you think to the manual layout?
!Good
!Not too bad
!Unhelpful
If there one thing you would like to see improved, what is it? .....................................................
....................................................................................................................................................
....................................................................................................................................................
Could you find the information you required easily using the index and/or the contents, if
possible please identify your experience: ...................................................................................
....................................................................................................................................................
....................................................................................................................................................
....................................................................................................................................................
....................................................................................................................................................
Do you have any comments in general about the Mitsubishi manuals? .....................................
....................................................................................................................................................
....................................................................................................................................................
....................................................................................................................................................
....................................................................................................................................................
Thank you for taking the time to fill out this questionnaire. We hope you found both the product
and this manual easy to use.
iii
FX-TRN-BEG-E
iv
INTRODUCTION
FX-TRN-BEG-E
INTRODUCTION
The method to set up the software and the flow of the lessons are explained in this section.
Please read to improve the effectiveness of the later lessons.
Contents
1. Introduction........................................................................................... A-3
2. Outline of the Lesson Plan ................................................................... A-5
2.1 Outline .................................................................................................................A-5
2.2 Setup of Software ................................................................................................A-6
2.3 Begin to Learn PLC Programming.......................................................................A-9
2.3.1 Start the Training Software........................................................................................A-9
2.3.2 User Registration.......................................................................................................A-9
2.4 Configuration of Main Menu ..............................................................................A-10
2.5 Configuration of Training Screen .......................................................................A-11
2.5.1
2.5.2
2.5.3
2.5.4
2.5.5
2.5.6
2.5.7
Training Screen .......................................................................................................A-11
3-D Virtual Manufacturing Cell ................................................................................A-12
Remote Control .......................................................................................................A-13
Ladder Program Area ..............................................................................................A-13
Guidance Window ...................................................................................................A-14
I/O Image Table for Virtual PLC ..............................................................................A-16
Operation Panel ......................................................................................................A-16
2.6 Writing a Program..............................................................................................A-17
2.6.1 Preparation for Ladder Editing ................................................................................A-17
2.6.2 Reading out the Model Answer ...............................................................................A-18
2.7 Operation Confirmation .....................................................................................A-19
2.7.1 Program Transfer ....................................................................................................A-19
2.7.2 Adjustment of Simulation Speed .............................................................................A-19
2.8 Self-judgement ..................................................................................................A-20
2.9 Exit.....................................................................................................................A-21
A-1
FX-TRN-BEG-E
INTRODUCTION
MEMO
A-2
FX-TRN-BEG-E
1.
Introduction 1
Introduction
The FX-TRN-BEG PLC Training Software creates a virtual manufacturing cell within in your
personal computer that enables the user to study PLC programming any time or place a
personal computer is available. The manufacturing cell and machines are shown in 3-D
graphic simulations that provide an enjoyable visual element to the PLC training. Watch the
programs that you create control the machines inside the virtual arena!
The structured lesson plans let the user decide at what level to begin the exercises. Clear
objectives are given for each exercise along with programming tips and examples to aid in the
learning process. The large number of exercises provide complete beginners and slightly more
advanced users with challenges appropriate to each skill level. Proceed through the exercises
at the speed that is right for you.
The software setup and the flow of the lessons are explained in Chapter 2. Please read
Chapter 2 to improve the effectiveness of the later lessons.
The 3-D graphic simulations will be controlled by the user program.
The software package includes the following items.
SW0D5C-FXTRN-BEG-E
CD-ROM for system installation:
1 piece
FX-TRN-BEG-E
package
FX-TRN-BEG-E
USER'S
MANUAL
This manual
• Introduction to the software
• Exercise list which supplements the
guidance display on your computer
• Operation of ladder tools
• Specifications of virtual PLC and
virtual machines
Please make sure
all components are
included.
A-3
FX-TRN-BEG-E
Introduction 1
MEMO
A-4
Outline of the Lesson Plan 2
FX-TRN-BEG-E
2.
Outline of the Lesson Plan
Follow the Lesson Plan Flowchar t below to better understand the setup of the PLC
programming lessons.
2.1
Outline
The chart below shows the overall flow of the training software.
Setup of software
• Install the data from the CD-ROM (☞ 2.2).
Startup of software
Starting
• Register as a User (☞ 2.3).
Menu display
• Select a category in the main menu
(☞ 2.4 or Exercise Section).
Selection of exercise
• Select an exercise you would like to try (☞ 2.5).
Confirmation of contents of exercise
• Read the guidance and understand the contents of the
exercise (☞ 2.5).
Creation of program
• Write a program following the guidance
(☞ 2.6 or Ladder Tool Section).
Confirmation of operation
• Transfer the program to the virtual PLC in your computer,
and confirm the machine operation.
(☞ 2.7).
Repeated learning
Self-judgement
End of exercise
End
• Judge the simulation result yourself. If you are a registered
User, points are added and your progress is updated.
(☞ 2.8).
• Exit the learning software. (☞ 2.9).
Stick to it while
aiming at the high
score!
A-5
FX-TRN-BEG-E
2.2
Outline of the Lesson Plan 2
Setup of Software
Set up the software following the procedure below.
• System requirements for your computer
OS
Microsoft Windows 98, 98SE, Me
Microsoft Windows 2000
Microsoft Windows NT4.0 (SP3 or later)
Microsoft Windows XP*1
CPU
Pentium 500 MHz or more is recommended.
Memory
64 MB or more (128 MB or more is recommended.)*2
Hard disk
150 MB or more
CD-ROM drive
1 unit (for installation)
Display
XGA (1,024 × 768) or more is mandatory.
Video
Video card compatible with Direct3D whose VRAM capacity is 4 MB or more
(8 MB or more is recommended.)
Browser
Internet Explorer 4.0 or later is mandatory.
*1 Only users having the administrator privilege are allowed to set up the software to the
Windows XP and start it up.
*2 Mount the memory having a capacity larger than the value recommended by the used
OS.
"Microsoft", "Windows" and "Windows NT" are registered trademarks or trademarks of
Microsoft Corporation USA in the USA and other countries. Other company names and
product names are trademarks or registered trademarks of each company.
Operating Procedure
1) Start Windows and insert the CD (SW0D5C-FXTRN-BEG-E) included in the package into
the CD-ROM drive to begin system installation. It is recommended to end other application
software before beginning the installation process.
A-6
FX-TRN-BEG-E
Outline of the Lesson Plan 2
2) The window below should be automatically displayed.
If the window is
not displayed
automatically,
double-click the
CD-ROM drive in
"My Computer".
Double-click this "Setup" icon on the window to start installation of the software.
* Three types of "Setup" icons are displayed. Double-click the one with a picture of a
computer.
3) When "Setup" is executed, the window shown below is displayed.
• After reading and understanding
messages, click [Next].
the
• Click [Cancel] to cancel installation.
4) Select a folder for the installation destination.
• If you wish to install it to the folder
displayed, click [Next].
• If you would like to change the folder, click
the [Browse] button to select the folder.
Click [Cancel] to cancel installation.
Installation destination folder
A-7
FX-TRN-BEG-E
Outline of the Lesson Plan 2
5) Determine the program folder name.
• The training software will be installed in
this program folder or another folder name
can be entered.
A folder of the same name would be
overwritten if it exists.
• Click [Next] to start the installation.
6) Complete the setup.
• It takes about 10 seconds to perform
installation. If you take the CD out of the
CD -RO M dr ive o r shu t d own your
computer during installation, the software
will not install properly.
• Click the [Finish] button to finish the setup.
* Take out the CD and carefully store it for
later use.
7) Program folders are displayed.
• When installation is completed, the
window shown on the left is displayed.
Did you install
it properly?
A-8
FX-TRN-BEG-E
Outline of the Lesson Plan 2
2.3
Begin to Learn PLC Programming
2.3.1
Start the Training Software
Let’s open the training software.
Select [Start] → [Programs] → [MELSOFT FX Trainer] → [FX-TRN-BEG-E].
Note: Do not use this software and MELSOFT GX Developer at the same time.
2.3.2
User Registration
When the software is opened the user registration window is displayed.
If registered as a user, exercises that have been successfully completed will be indicated on
the menu and points will be added to the user score.
If you do not wish to
register as a user, click
[Start] leaving the boxes
blank.
• Fill in the name and password fields to register for the first time.
Name:
Alphabetic and numeric ... 32 characters or less
Password: Numeric
... 8 characters or less
• If already registered as a user, select the user name on the pull-down menu and enter the
password.
If the password does not match, an error message will occur and the password must be
re-entered. The main menu is not accessible.
Register as a new user if the password is forgotten.
User registrations can be deleted by selecting “File” → “Delete user information” from the
tool menu.
A-9
FX-TRN-BEG-E
2.4
Outline of the Lesson Plan 2
Configuration of Main Menu
You can select an exercise from the main menu.
Main menu screen
Category tabs
’good’ award*
Exercise button to jump
to training screen
Number of times the
exercise has been
completed.
Links to the outline of
training software
Your score
The number of the stars indicates the
difficulty level.
* If you have registered as a user, the award
is displayed on the exercise buttons that
have been completed.
From which
exercise shall we
begin today?
A-10
FX-TRN-BEG-E
2.5
Outline of the Lesson Plan 2
Configuration of Training Screen
When you select an exercise, the Ladder Program Area, Virtual Manufacturing Cell, and the
Operation Panel are displayed as shown below.
2.5.1
Training Screen
Menu Bar
Guidance Window
(☞ 2.5.5)
Minimizes the
screen.
Fixes the screen
display size.
Ends the
training
session
Remote
Control
(☞ 2.5.3)
3-D Graphic
Simulation
Virtual
Manufacturing
cell window
(☞ 2.5.2)
Ladder Program Area
I/O Image Table for
(☞ 2.5.4 and Ladder Tool Section) monitoring RUN status
in the virtual PLC
(☞ 2.5.6)
Operation Panel
(☞ 2.5.7)
Different machines and operation panels for
simulation will be displayed automatically
depending on the exercise. Let's try to operate
them correctly following the guidance.
A-11
FX-TRN-BEG-E
2.5.2
Outline of the Lesson Plan 2
3-D Virtual Manufacturing Cell
A different machine is displayed for each exercise to be simulated.
• You can choose the view the machine by pressing the [F] / [T] / [S] button on the remote
control or selecting the direction on the "Tools" menu.
Side view
Front view
Top view
• The device numbers are assigned to all the inputs and outputs of the machine as seen in
the 3-D graphic simulation.
The I/O list can be displayed selecting "Edit" → "I/O list" on the simulation menu. The lists
are also found on the pages in the ’EXERCISES’ section in this manual.
Example of I/O list display
A-12
FX-TRN-BEG-E
2.5.3
Outline of the Lesson Plan 2
Remote Control
Switches the mode in the virtual PLC from RUN to STOP.
Remote control
Tutor box
Displays or hide the guidance window.
[Edit Ladder]
Allows to create and modify programs in the ladder program
area.
Switches the mode in the virtual PLC from RUN to STOP.
[Write to PLC]
Transfers the program you create in the ladder program area to
the virtual PLC.
[Reset]
Returns the simulated machine to the initial condition.
- Resets the simulation in case of unwanted occurrence (such
as parts are stuck) takes place.
- Initializes the virtual PLC.
Initializes outputs or devices.
(The same operation as an actual PLC is switched from STOP
to RUN mode.)
[F] / [T] / [S]
Changes over the view point of the 3D screen.
Learning status display
Indicates the status such as “LEARN”, “PROGRAM” and “RUN”.
[Main]
Displays the main menu, or saves the program being edited and
then displays the main menu.
Jump buttons
Clicked to go to the next/previous page in the guidance.
(Use these buttons when indicated on the page.)
Title bar
Click the tutor on the remote control to alternately hide and
display the guidance window.
Or select “Tool” → “Fix remote control bar” and delete the check
mark to display the title bar at the top of the remote control. By
dragging the title bar using the mouse, you can move the
guidance window to an arbitrary position.
• The remote control can be displayed or hidden selecting “Tools” → “Remote Control“.
2.5.4
Ladder Program Area
Use this area to edit, create, monitor, save and print programs.
The details are explained in the ’LADDER PROGRAMS’ Section in this manual.
A-13
FX-TRN-BEG-E
2.5.5
Outline of the Lesson Plan 2
Guidance Window
The guidance window displays the programming objectives, lessons, hints, and instructions for
the training software. (The display position is determined by the display position of the remote
control.)
• Outline of guidance
Example of guidance display
You can move it to an arbitrary position by dragging the title bar using
the mouse.
When it comes near a corner of the training software, it is absorbed.
If the title bar is not displayed on the remote control, select “Tool” →
“Fix remote control bar” from the tool menu, then delete the check
mark.
Chapter tabs
Title bar (2.5.3))
Tutor box
Displays or hide the
guidance window.
Scroll bar
Jump buttons
(Use them when
indicated on the page.)
Example of
hint page
Example of first page
in next chapter
A-14
- Xem thêm -